By Dennis Mortensen In Annotation, Automation | July 2024
How to Automate Screenshot Annotations for Your Knowledge Base Articles
A well-chosen screenshot can greatly improve the readability and clarity of a help article, and to further underline that fact, a well-annotated screenshot helps explain and emphasize information that might otherwise be hidden.
Screenshots in Documentation
We all understand the power of using screenshots in our help articles and documentation. Consistently, users surveyed about any help center or knowledge base express a strong desire for more and higher-quality screenshots.
However, this doesn't mean you shouldn't have guidelines for when and where to use them. The type and number of screenshots per article will vary depending on your product (typically a SaaS App). And it is generally hard to argue against product screenshots given how potent they are in visually showing users how to take suggested actions and what they'll achieve by following the proposed process. Screenshots can also help orient users through a tricky UI path, illustrate complex concepts, and not least serve as strong visual cues that they've landed on the right article, reducing bounce rates.
We all have our own individual version of the above justification, and I'm sure you have yours. Even if you are more prudent in your use of screenshots, those you do choose to insert are likely often annotated in some capacity. Which brings us to the topic at hand.
Annotate Your Screenshots
A well-chosen screenshot or image can greatly improve the readability and clarity of a document. Conversely, an unclear and hard-to-understand image can slow things down. So we must be diligent in our choice of what we show, how consistently we display it, the captions we provide, and more often than not, the annotations we apply to our screenshots.
Well-annotated screenshots add strong visual cues, highlight specific areas, and provide context, making it easier for others to understand your message. They allow you to explain in greater detail how one should interpret parts of the screenshot you've highlighted.
Spelling it out, so we are all in the same boat; Screenshot annotation involves adding labels (which could include text) directly on the image to give more information or emphasize an area. This draws attention to specific elements in a screenshot, guiding viewers to important details, eliminating lengthy explanations in our text, and reducing the chances of misunderstanding.
What to Annotate in Your Screenshots
When it comes to highlighting information in screenshots, the rules are straightforward: to maximize their efficiency, make it clear to readers what they’re looking at.
Annotation boxes around significant pieces of information will help direct readers’ attention to the point of interest.
Be concise. Ensure annotations are easy to distinguish from UI text. For example, offset your boxes so they don't look like UI elements. I cannot emphasize this enough, and it is why we so often see dramatic colors and line thickness in annotation; to separate what is drawings on the UI and what is the UI itself. Be aware that annotations (if text is used) are often not translated. Don't use an annotation at the top that acts like a title — use a caption instead. Ensure annotations are visible in both dark and light mode versions of your App, should you produce screenshots of both modes.
Unless automated, some might recommend using annotations cautiously because they are difficult to keep up to date. I'm of the automation generation, but even if not, my rule of thumb is that my personal inconvenience in keeping something up to date should not cause the user more trouble than necessary. They are already in a help article, so it's not like you are meeting them on a good day. In other words, the answer should mostly be your version of "suck it up, Dennis"! ;)
A few common types of screenshot annotation:
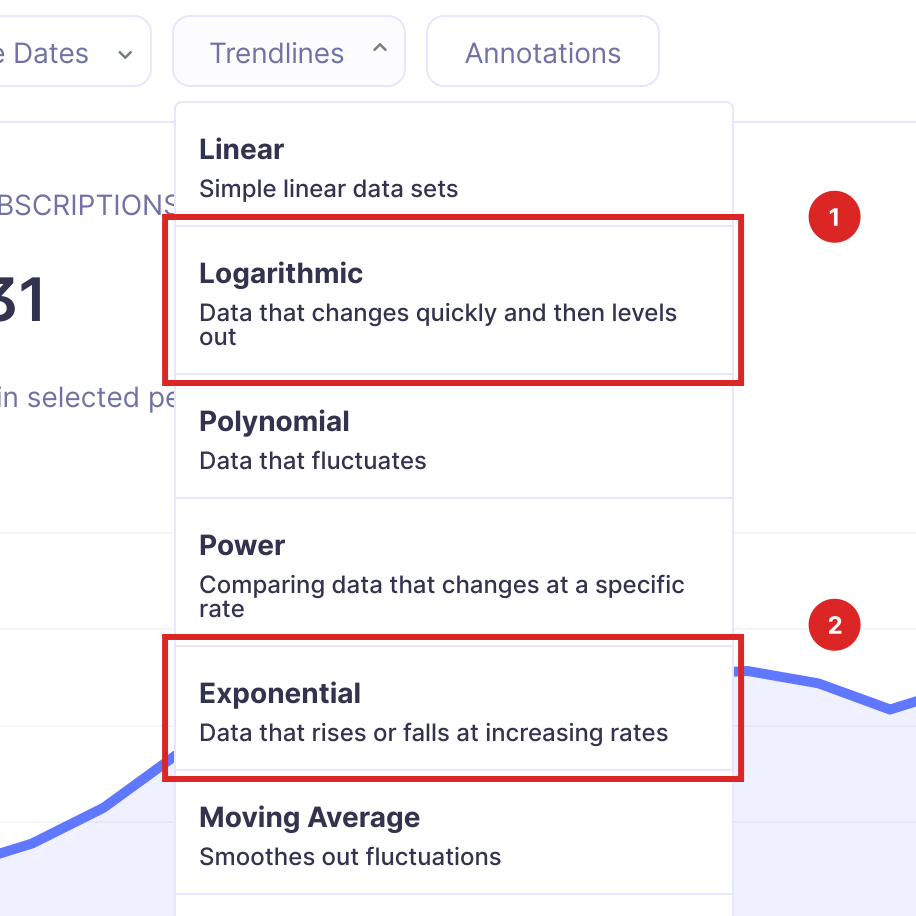
Callout Boxes
The typical red rectangle is my go-to annotation, and nothing really beats it. Use callouts to highlight an element within a screenshot. If possible, don't add text to your callout box — that's what our docs are for.
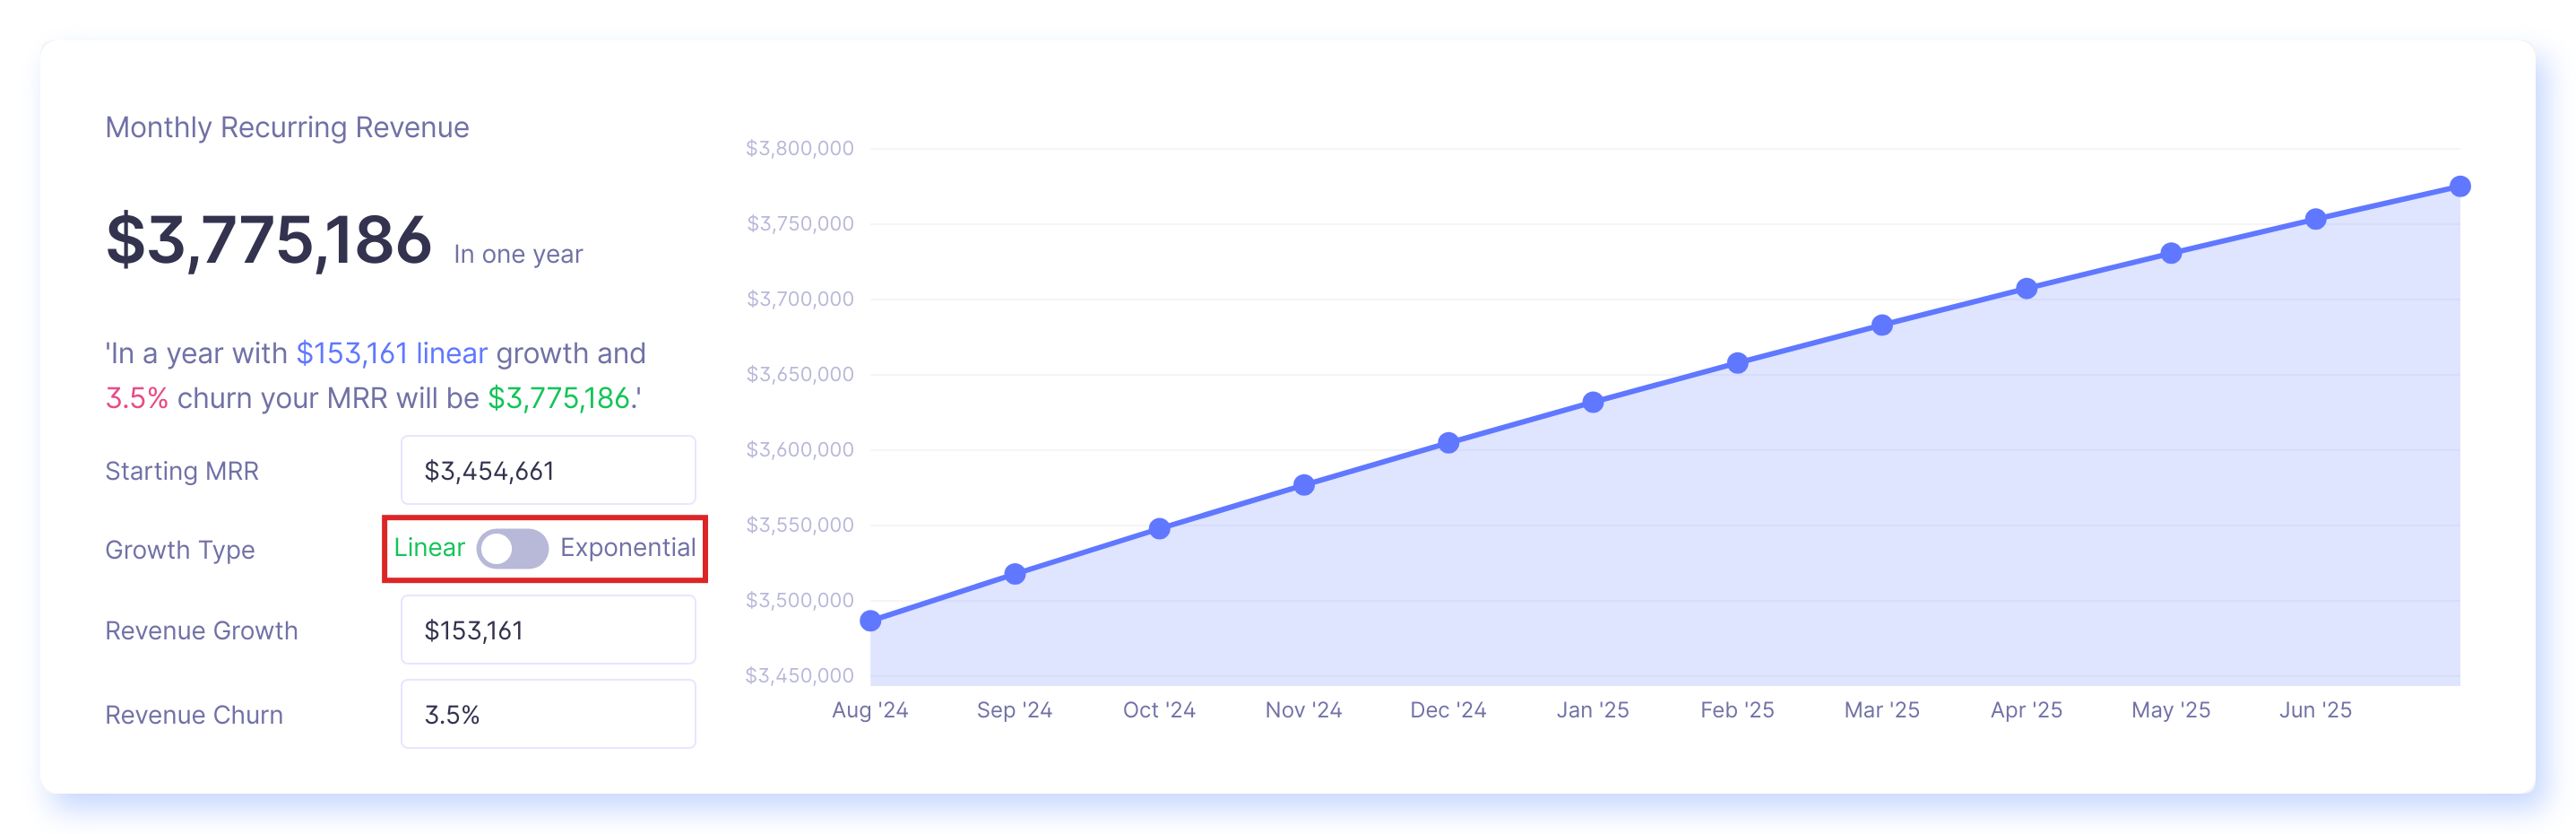
Callout boxes should not aggressively obstruct any of the elements they're highlighting. For example, a callout box around a UI button shouldn't cover any part of the button. If your screenshot platform supports it, insert a 5-10 pixel clearance (offset) between the UI element and the callout box. If you use multiple annotations and have two or more rectangles, you should pair this with an enumeration feature to call out distinct boxes.
Arrows
You'll often see people use arrows in conjunction with rectangles (callout boxes), especially if the box is small. Some do it as part of their style guide. However, there are also good arguments for using the arrow alone, especially if the callout box is too heavy and distracting for small items. Or if the area is not a rectangle.
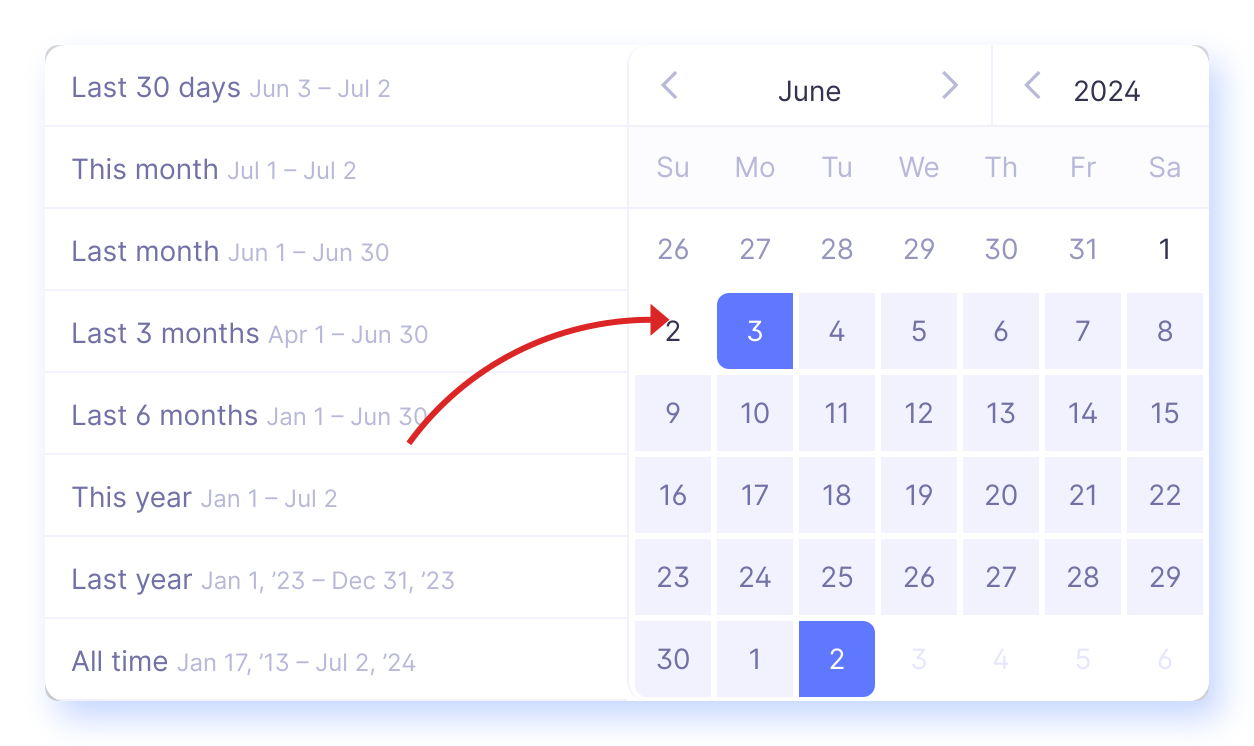
Almost always use a single-headed arrow when you want to reference elements within the UI. You are after all pointing at something.
Captions
Captions most often appear below images, in text, to give supporting context to readers. However, there are arguments for injecting them into the image itself, especially if the screenshots are also used outside of the help article, such as in chat sessions, where they have to stand alone.
Keep the following in mind: keep captions short and avoid inserting procedures or anything similar. Insert complementary information, not identical to the surrounding text. Make captions easy to skim. Encourage readers to look at the surrounding text. Don't put required information in captions that are not available elsewhere.
Enumeration
If there are multiple steps or clicks in the same screenshot, add multiple arrows or callout boxes and enumerate them (a sequence of numbers) so readers can see which step you are talking about. If your enumeration gets into two digits (10+), you might want to consider splitting this into two or more screenshots of smaller areas.

Surrounding Text
Some will argue that the explanation of the annotations should typically come before the image. This way, readers will know what to look for in the annotated image and understand its context before viewing it. I am peronally less religious about this, as long as you are consistent. If you're not using any annotations or captions, I am easier to convince that you add text directly before to give helpful context.
How to Add Annotations
Manual Annotation
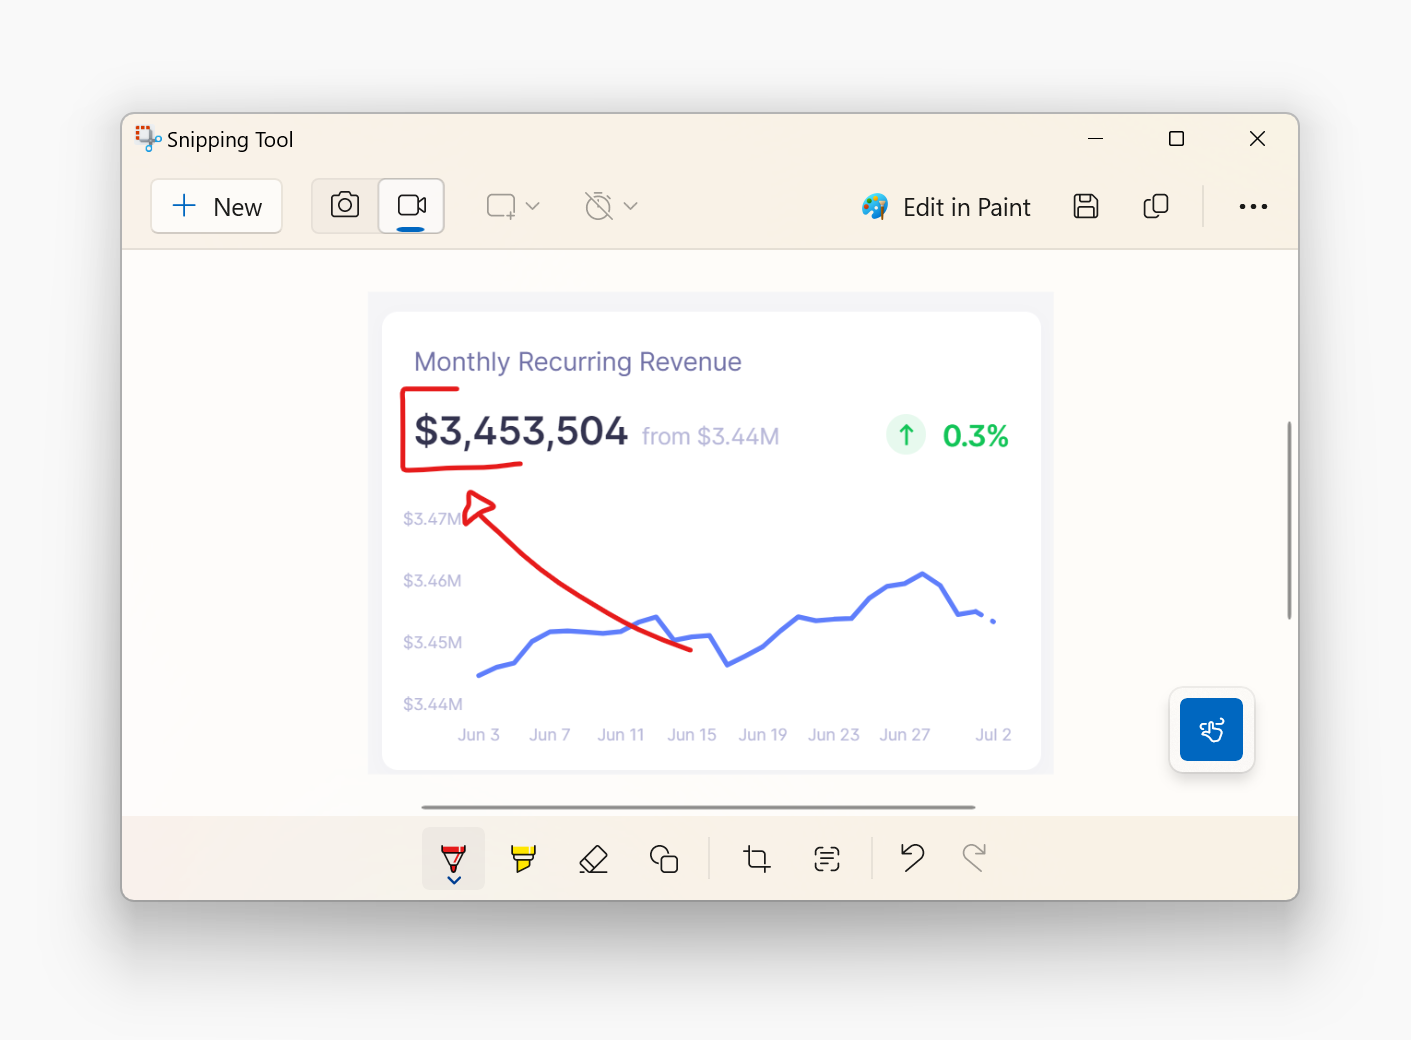
There are plenty of fine tools that will help you apply annotations to your images. And to be brutally honest, pre-automation, I've mostly used either of the built-in OS tools, as they were also the go-to tools for capturing screenshots to begin with. Very hacky, but I am probably not alone here! 😁
- Windows Snipping Tool: Press
Shift + Windows + Sto draw a selected area to capture. - Apple Preview Tool: Press
Shift + Command + 4to draw a selected area to capture.
These built-in tools also offer basic annotation, which is a good way to get started. If you look back at my social timeline (where I am the most cowboy), you'll see most of what I explained i public was done using the built-in OS tools. Handrawing like nobody's business!
If it's not time for automation, I do recommend finding a proper tool, especially one where you can save and utilize a both a screenshot and annotation style template across team members for overall style and annotation consistency.
How to Automate Annotations on My Screenshots
Now, to finally answer the question: how do you automate annotations on your screenshots?
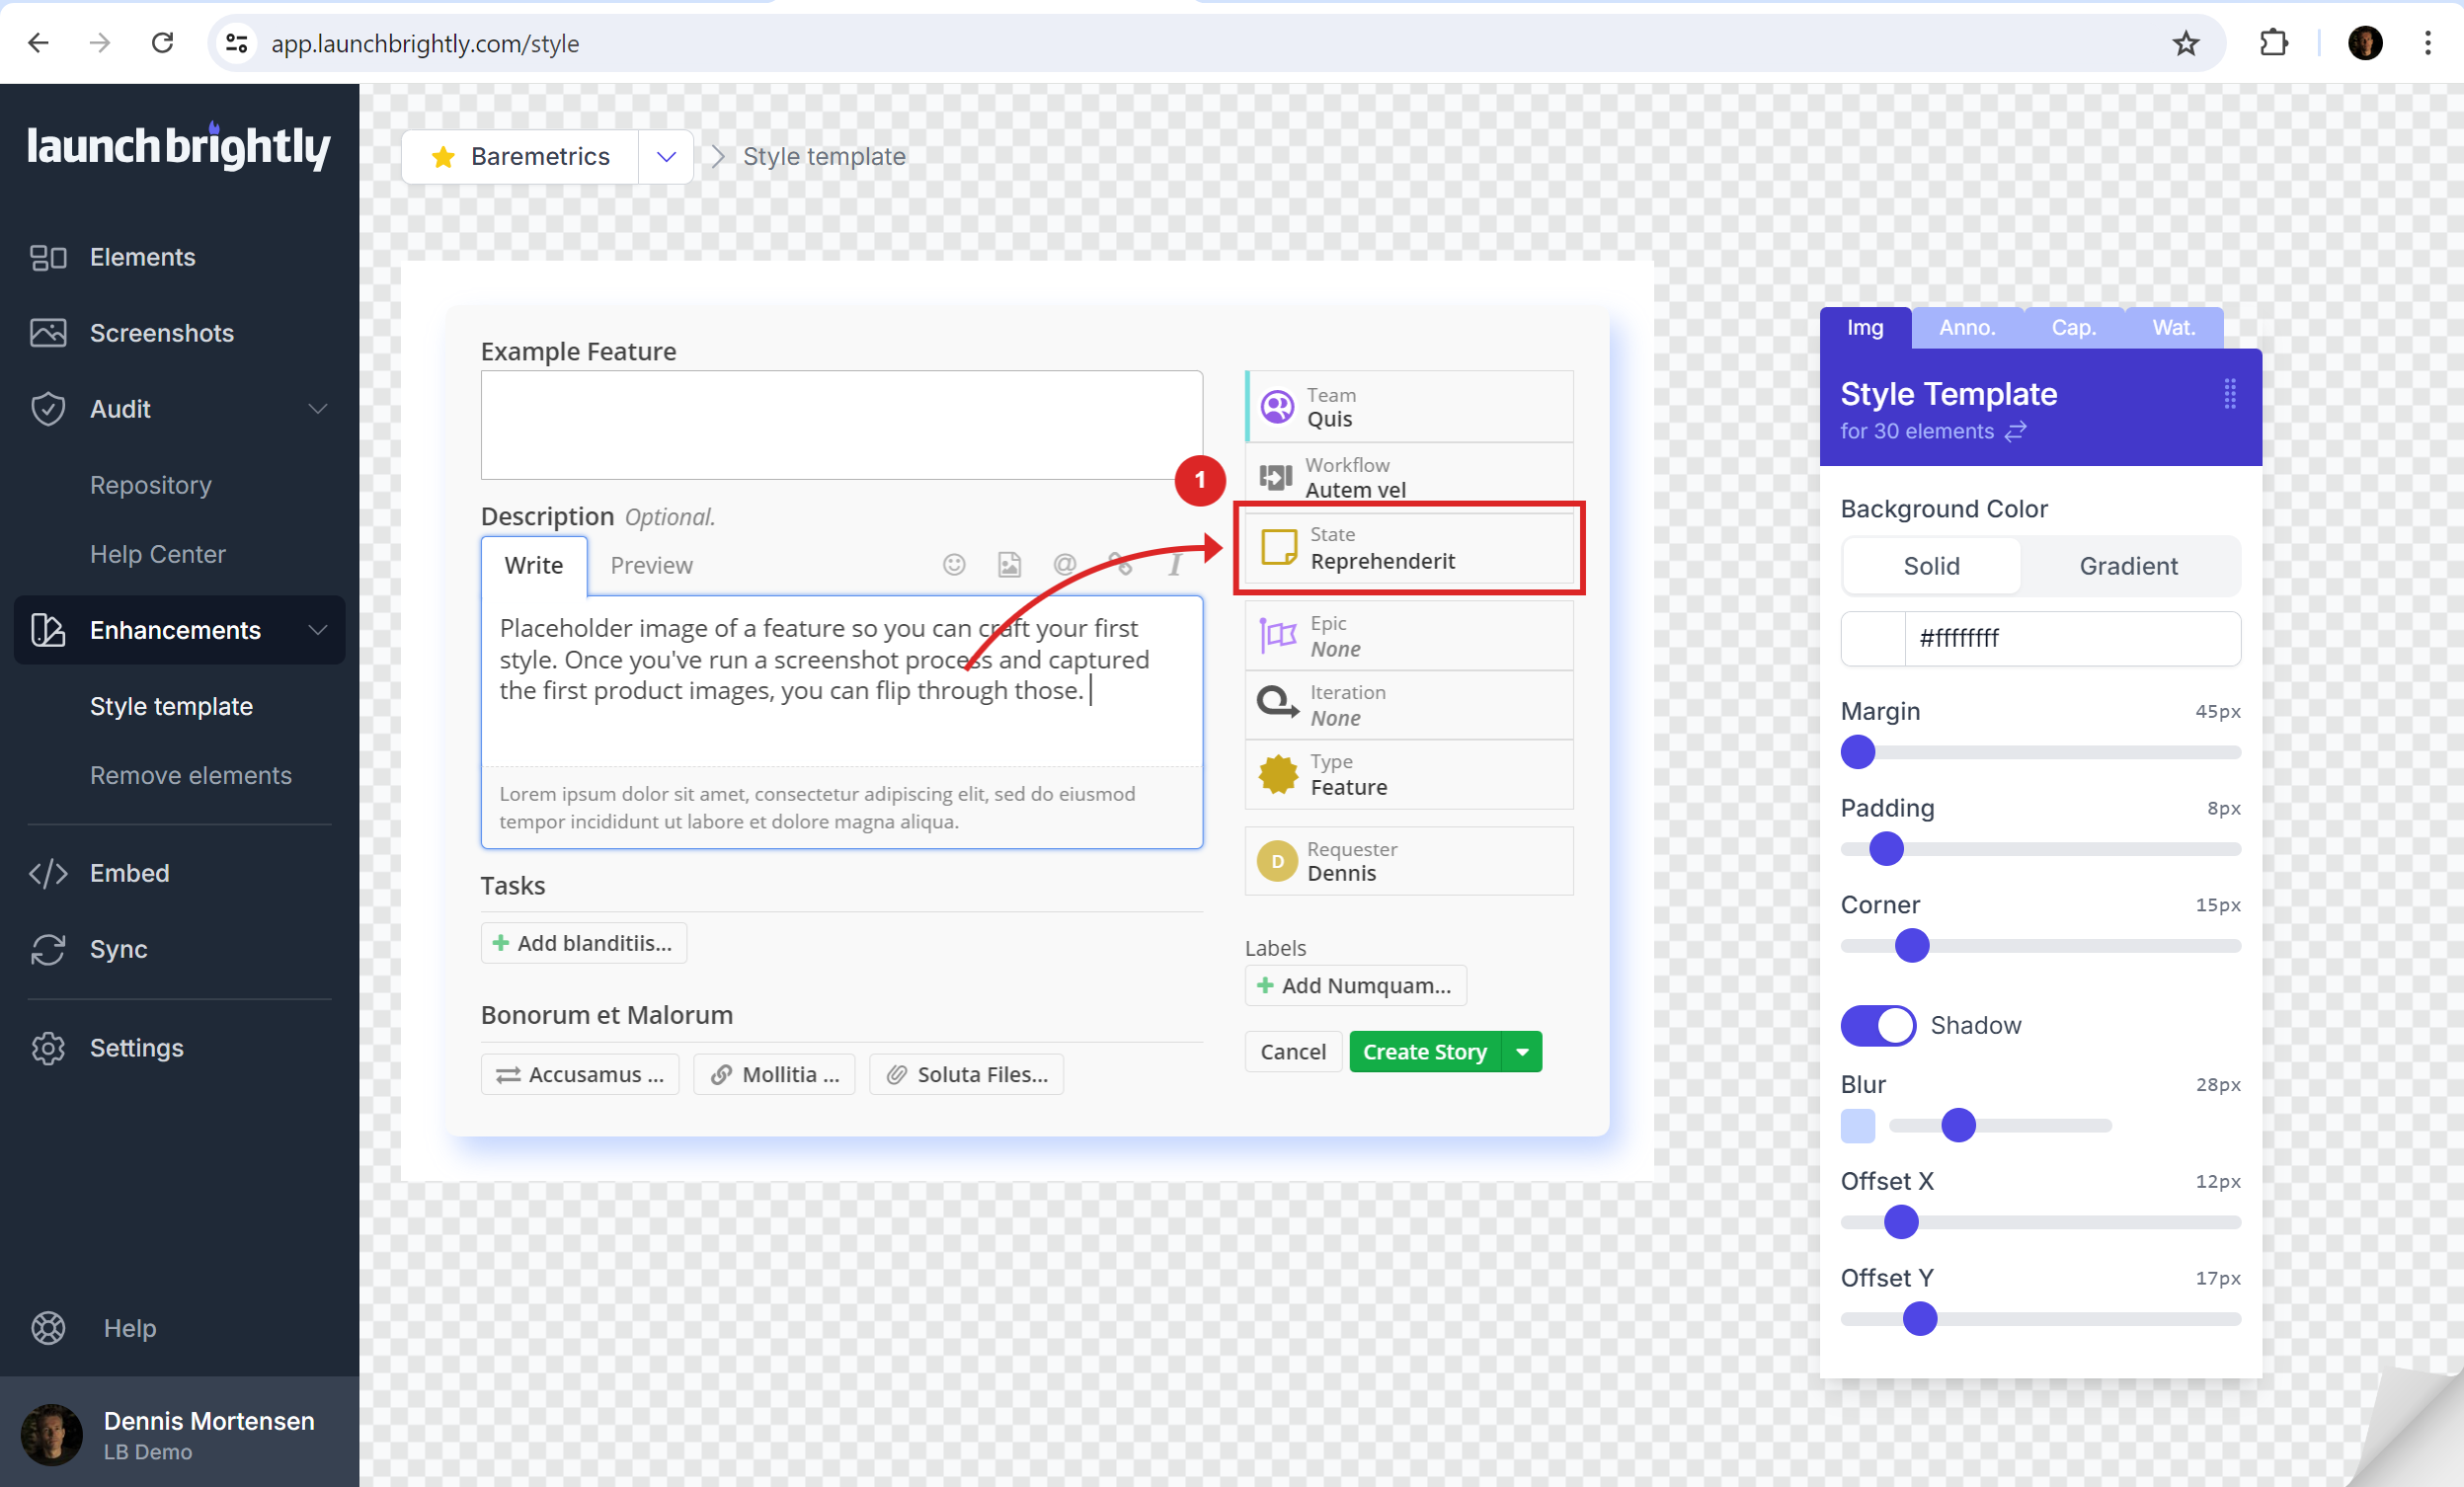
Whether you choose a product screenshot automation tool like LaunchBrightly or not, the first step in any automation is to put in place a style template. A subset of that will be the styling of your annotations. This style should be applied consistently across all screenshots and annotations as you reprocess (even if by hand) your screenshots. Ensuring they are on-brand and consistent from screenshot to screenshot. Consider the following casual notes:
- Customize your screenshot styling template to match your brand identity, while still accepting you must make it clear what is annotation and what is UI.
- Ensure they are consistently applied, providing your customers with a recognizable and trustworthy experience. Minimizing learning curves and reducing cognitive load.
- For annotation, you should distinctly select the preferred annotation color and width of your screenshot annotations and the desired offset around each annotated element. If you do this well, you are off to a great start, middle and ending of your annotation journey.
- Set the font size, color, and position of your screenshot captions, as they might be applied.
The focus here is to encode your choices into a set of parameters that are applied consistently across all screenshots reliably and repeatedly. Your journey might start with a manual process, but you should always have automation in mind imho, and your style guide should have a nicer version of this JSON for your style guide doc. So when it is time to implement internal handcoded automation or use a platform, you have a clear set of guidelines to inject.
{
  ...
  "margin": 75,
  "borderRadius": 15,
  "shadow": true,
  "shadowColor": "#0f172a5e",
  "shadowBlur": 40,
  "shadowOffsetX": 4,
  "shadowOffsetY": 22,
  "annotationOffset": 10,
  "annotationWidth": 5,
  "annotationColor": "#dc2626ff",
  ...
}
In LaunchBrightly, and excuse my obvious bias here, we have a screenshot and annotation style template that you manage, and we apply it to all your screenshots. This way, you can ensure that all your screenshots are annotated in the same style, making them easily recognizable and consistent across your documentation. You can change the style at any time, and all your screenshots will be updated automatically. Those are the wonders of automation.
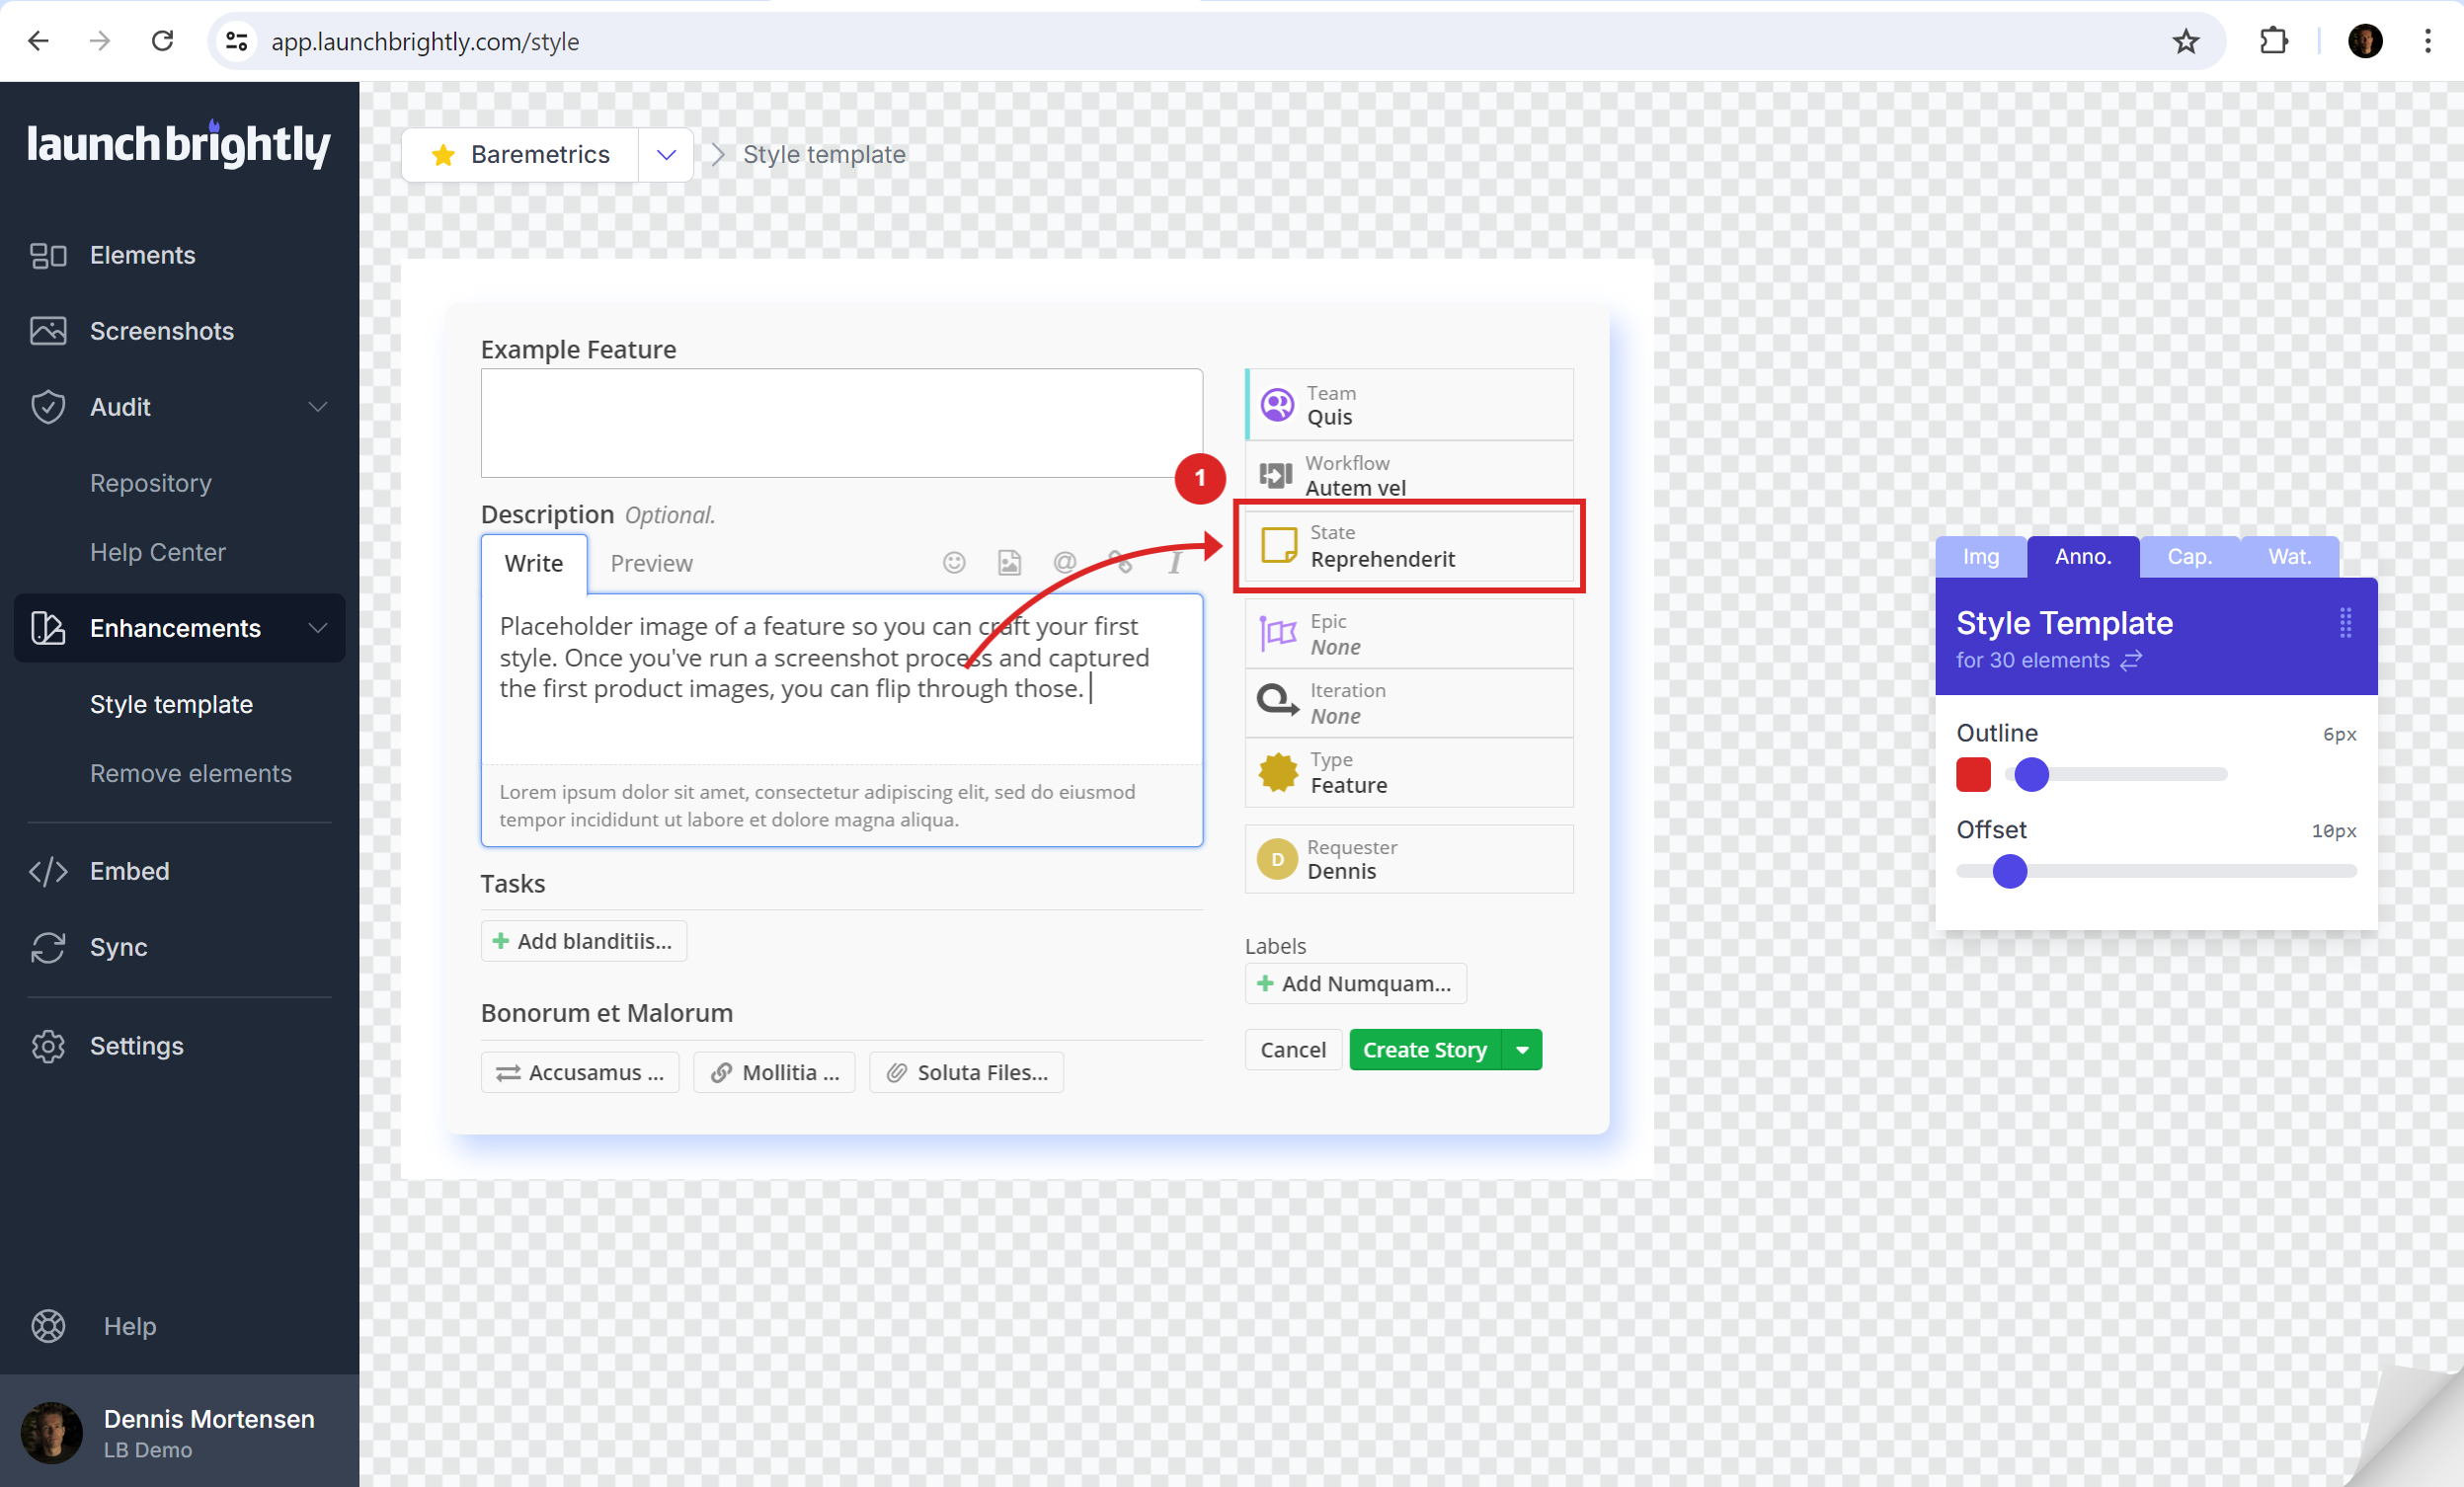
And most importantly, while still a closing note to this post, when you set up screenshot automation recipes, you never draw on a screenshot, you always pick UI elements (components) to annotate, so you are not married to a set of pixel coordinates. This way, you can be sure that your annotations are always in the right place, even if the UI changes. Which is a superpower tbh. I cannot emphasize this enough, you should be completely allergic to pixel coordinates, as you are forever married to the past and any change requires you to start over. There's a whole separate post on this, but I'll leave it here for now.
If you have any comments or just want to geek out on automated screenshots and annotations ping me at dennis@launchbrightly.com, or feel free to steal some time:
Cheers
/d. :-)