By Josh Peacock In Best Practices, Screenshots, Automation | September 2026
Inside a screenshot automation Proof of Concept
What it looks like to prove screenshot automation against your own product and help center — from initial import through to your first screenshot audit.
The product screenshots in your help documentation carry more of the communication load than most teams give them credit for. Before a customer has finished reading the first line of an article, they've already scanned the screenshots — orienting themselves, confirming they've landed in the right place, and building the confidence to keep reading.
The problem is that your product doesn't stand still. Navigation changes, workflows evolve, new UI components appear, and existing screens get redesigned. As your help center grows, keeping every screenshot aligned with those changes becomes increasingly difficult — especially because screenshots rarely live in isolation.
A screenshot of your navigation might appear in onboarding guides, troubleshooting articles and feature walkthroughs. A settings page might anchor an entire section of your help center. That's usually a good sign: your documentation is maturing and visual assets are being reused rather than recreated from scratch.
But reuse creates dependency.
When one of those screenshots changes, every article that relies on it can suddenly be out of date. Keeping everything current means noticing the change, knowing everywhere the screenshot is used, and then updating each instance. Across hundreds of articles and screenshots, doing all three reliably becomes increasingly difficult.
Screenshot automation changes that model by turning screenshot maintenance into a repeatable process — reproducing product workflows, applying consistent styling, generating fresh screenshots, detecting visual changes, reviewing updates, and syncing approved screenshots back into your help center.
For teams that want to see how that process works in their own environment before scaling it further, a focused Proof of Concept (POC) can be a useful place to start.
A meaningful POC doesn’t require automating everything. Instead, it takes a representative slice of your own product and documentation and runs it through the complete workflow — using your authentication, your visual standards, and the kinds of product interactions your help content actually depends on.
The goal is to move beyond a generic demo and see screenshot automation operating against the real systems your team already uses: from understanding the screenshots you’re maintaining today through to generating, reviewing, and syncing fresh versions back into your documentation.
You can explore that process independently or have our Implementation Specialists run the POC with you. Either way, the goal is the same: to see the complete workflow working against your own product and documentation, and understand how that automation scales into an ongoing process that keeps your help center current.
Here’s what that looks like in practice.
Connect your help center and import your existing screenshots
A useful place to start is with the screenshots already living in your help center.
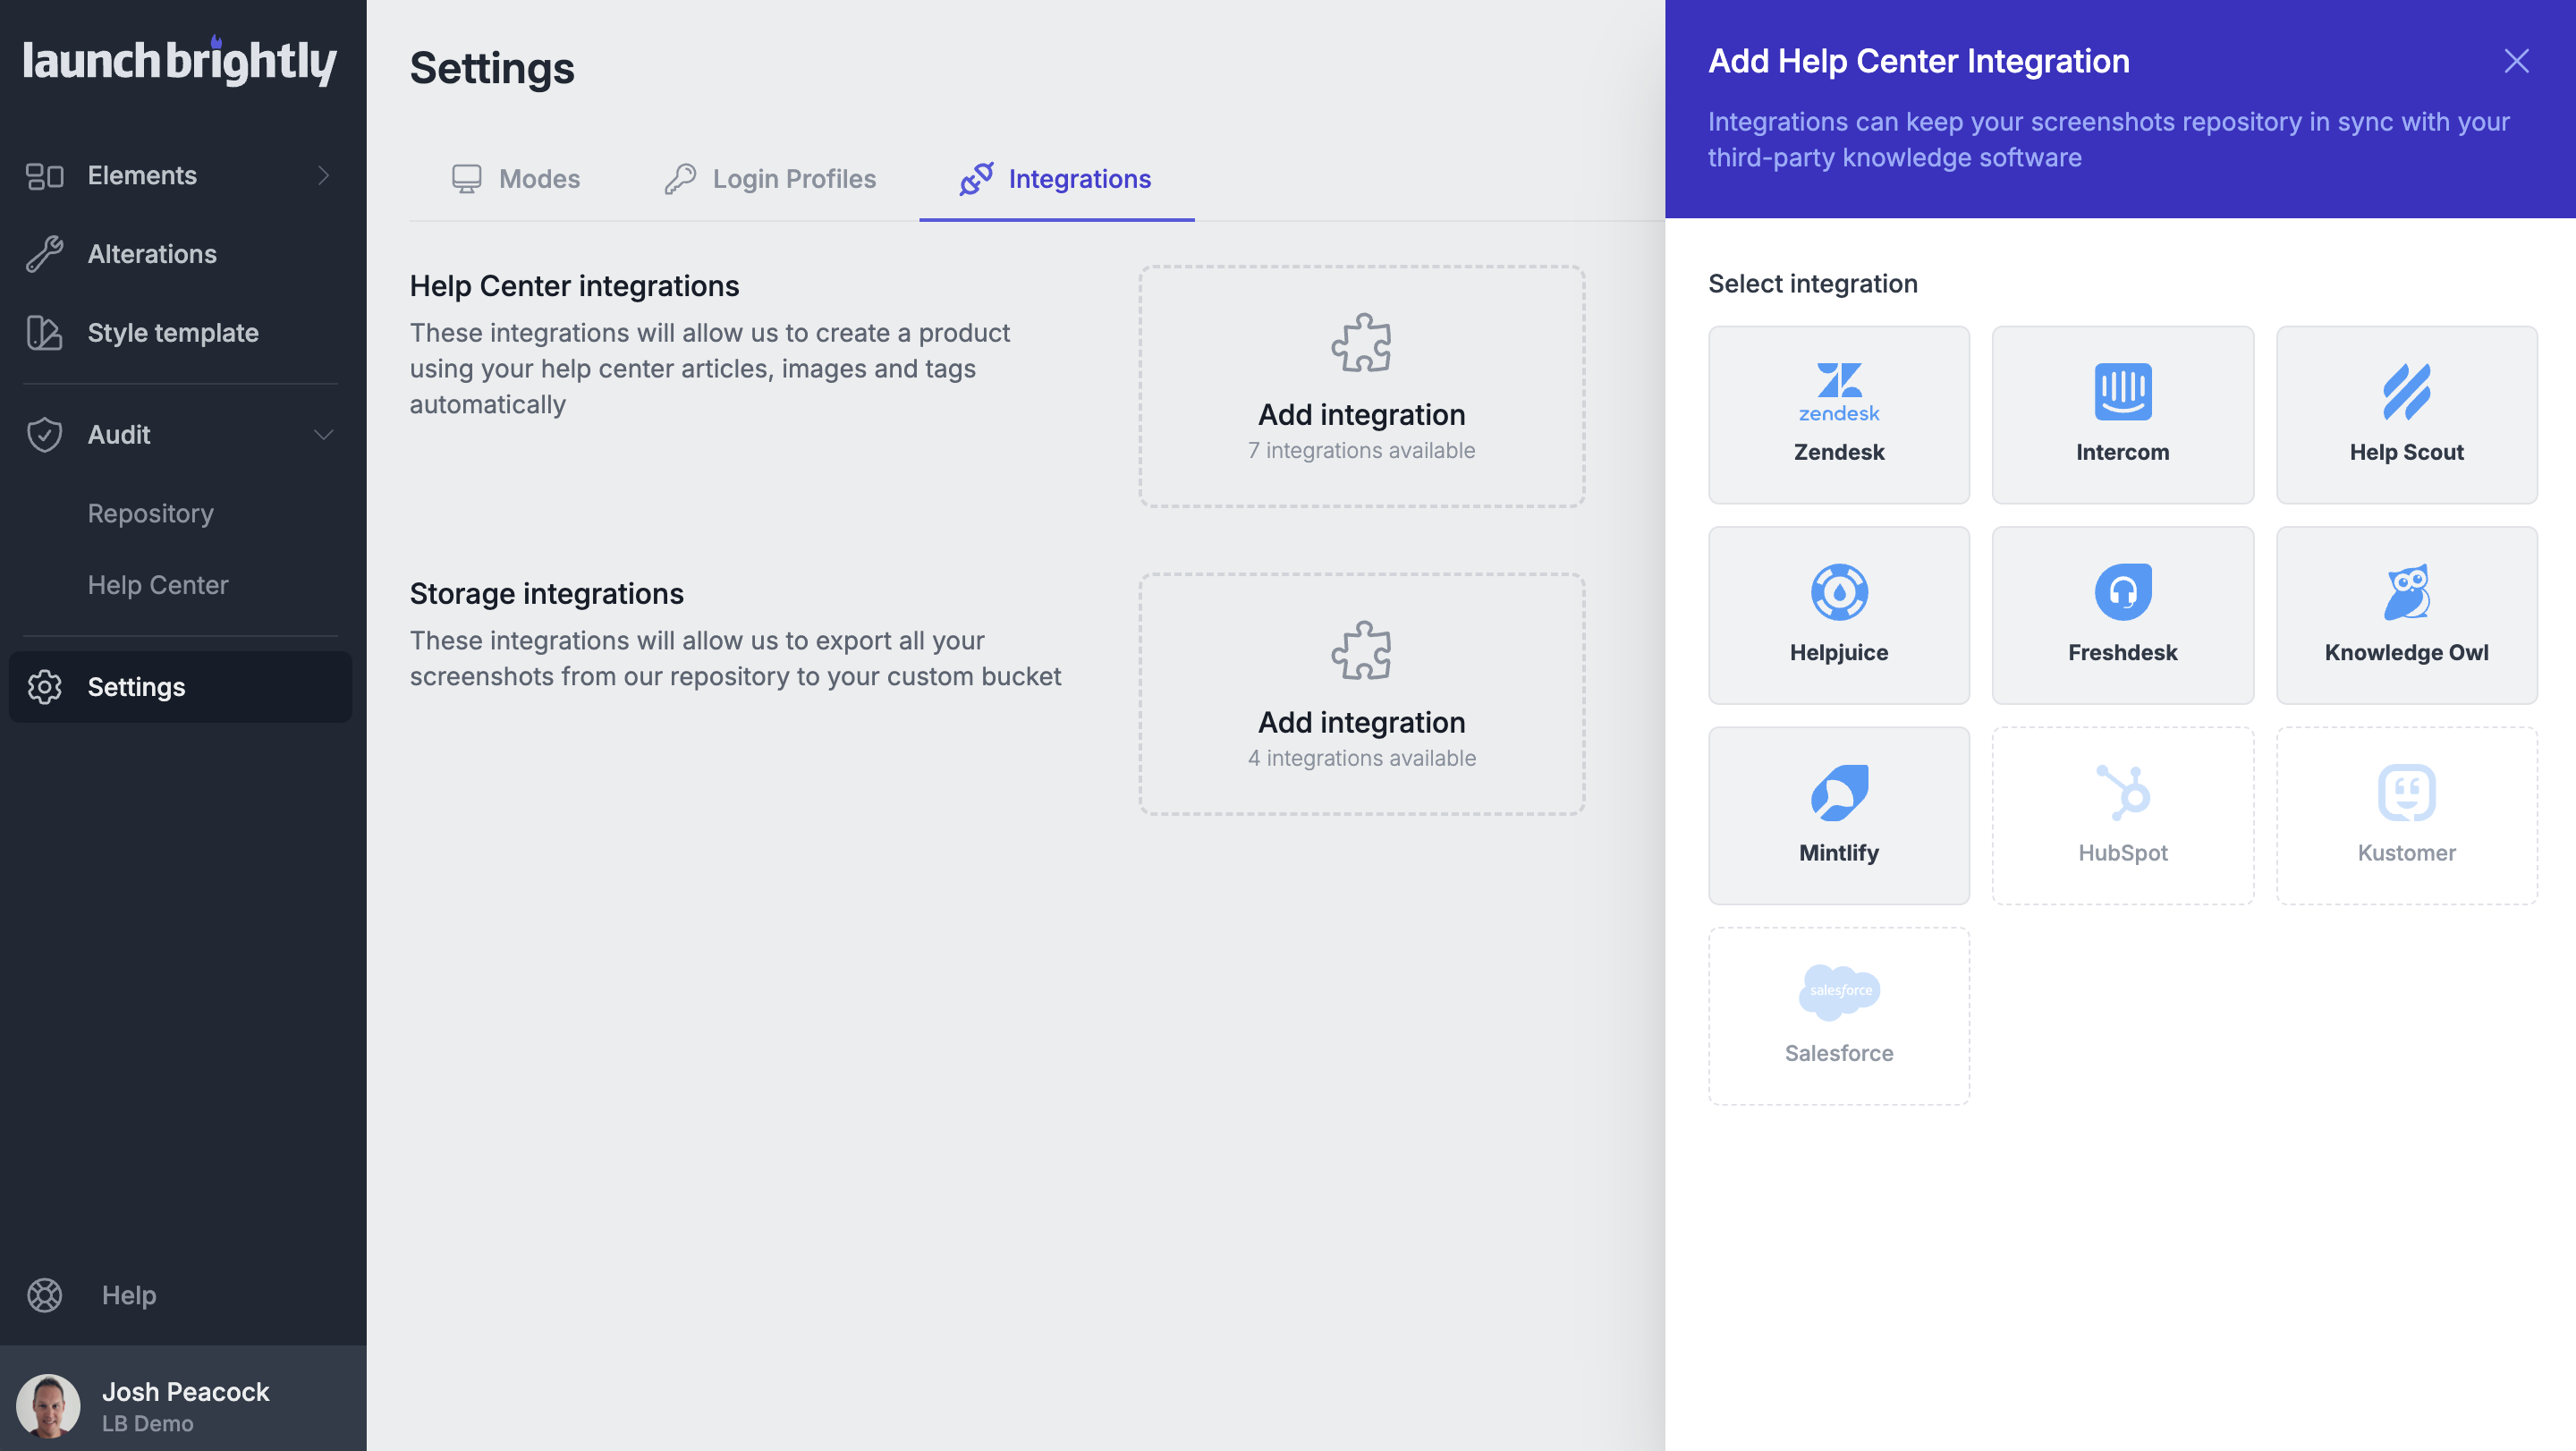
With your help center or documentation platform connected, the screenshot automation platform can import the articles and images already in place. The connection takes a matter of minutes, and access is limited to the help center content needed to manage and maintain your product visuals and help content. The platform does not access conversations, inboxes, customer messages, tickets, contacts, or other customer data.
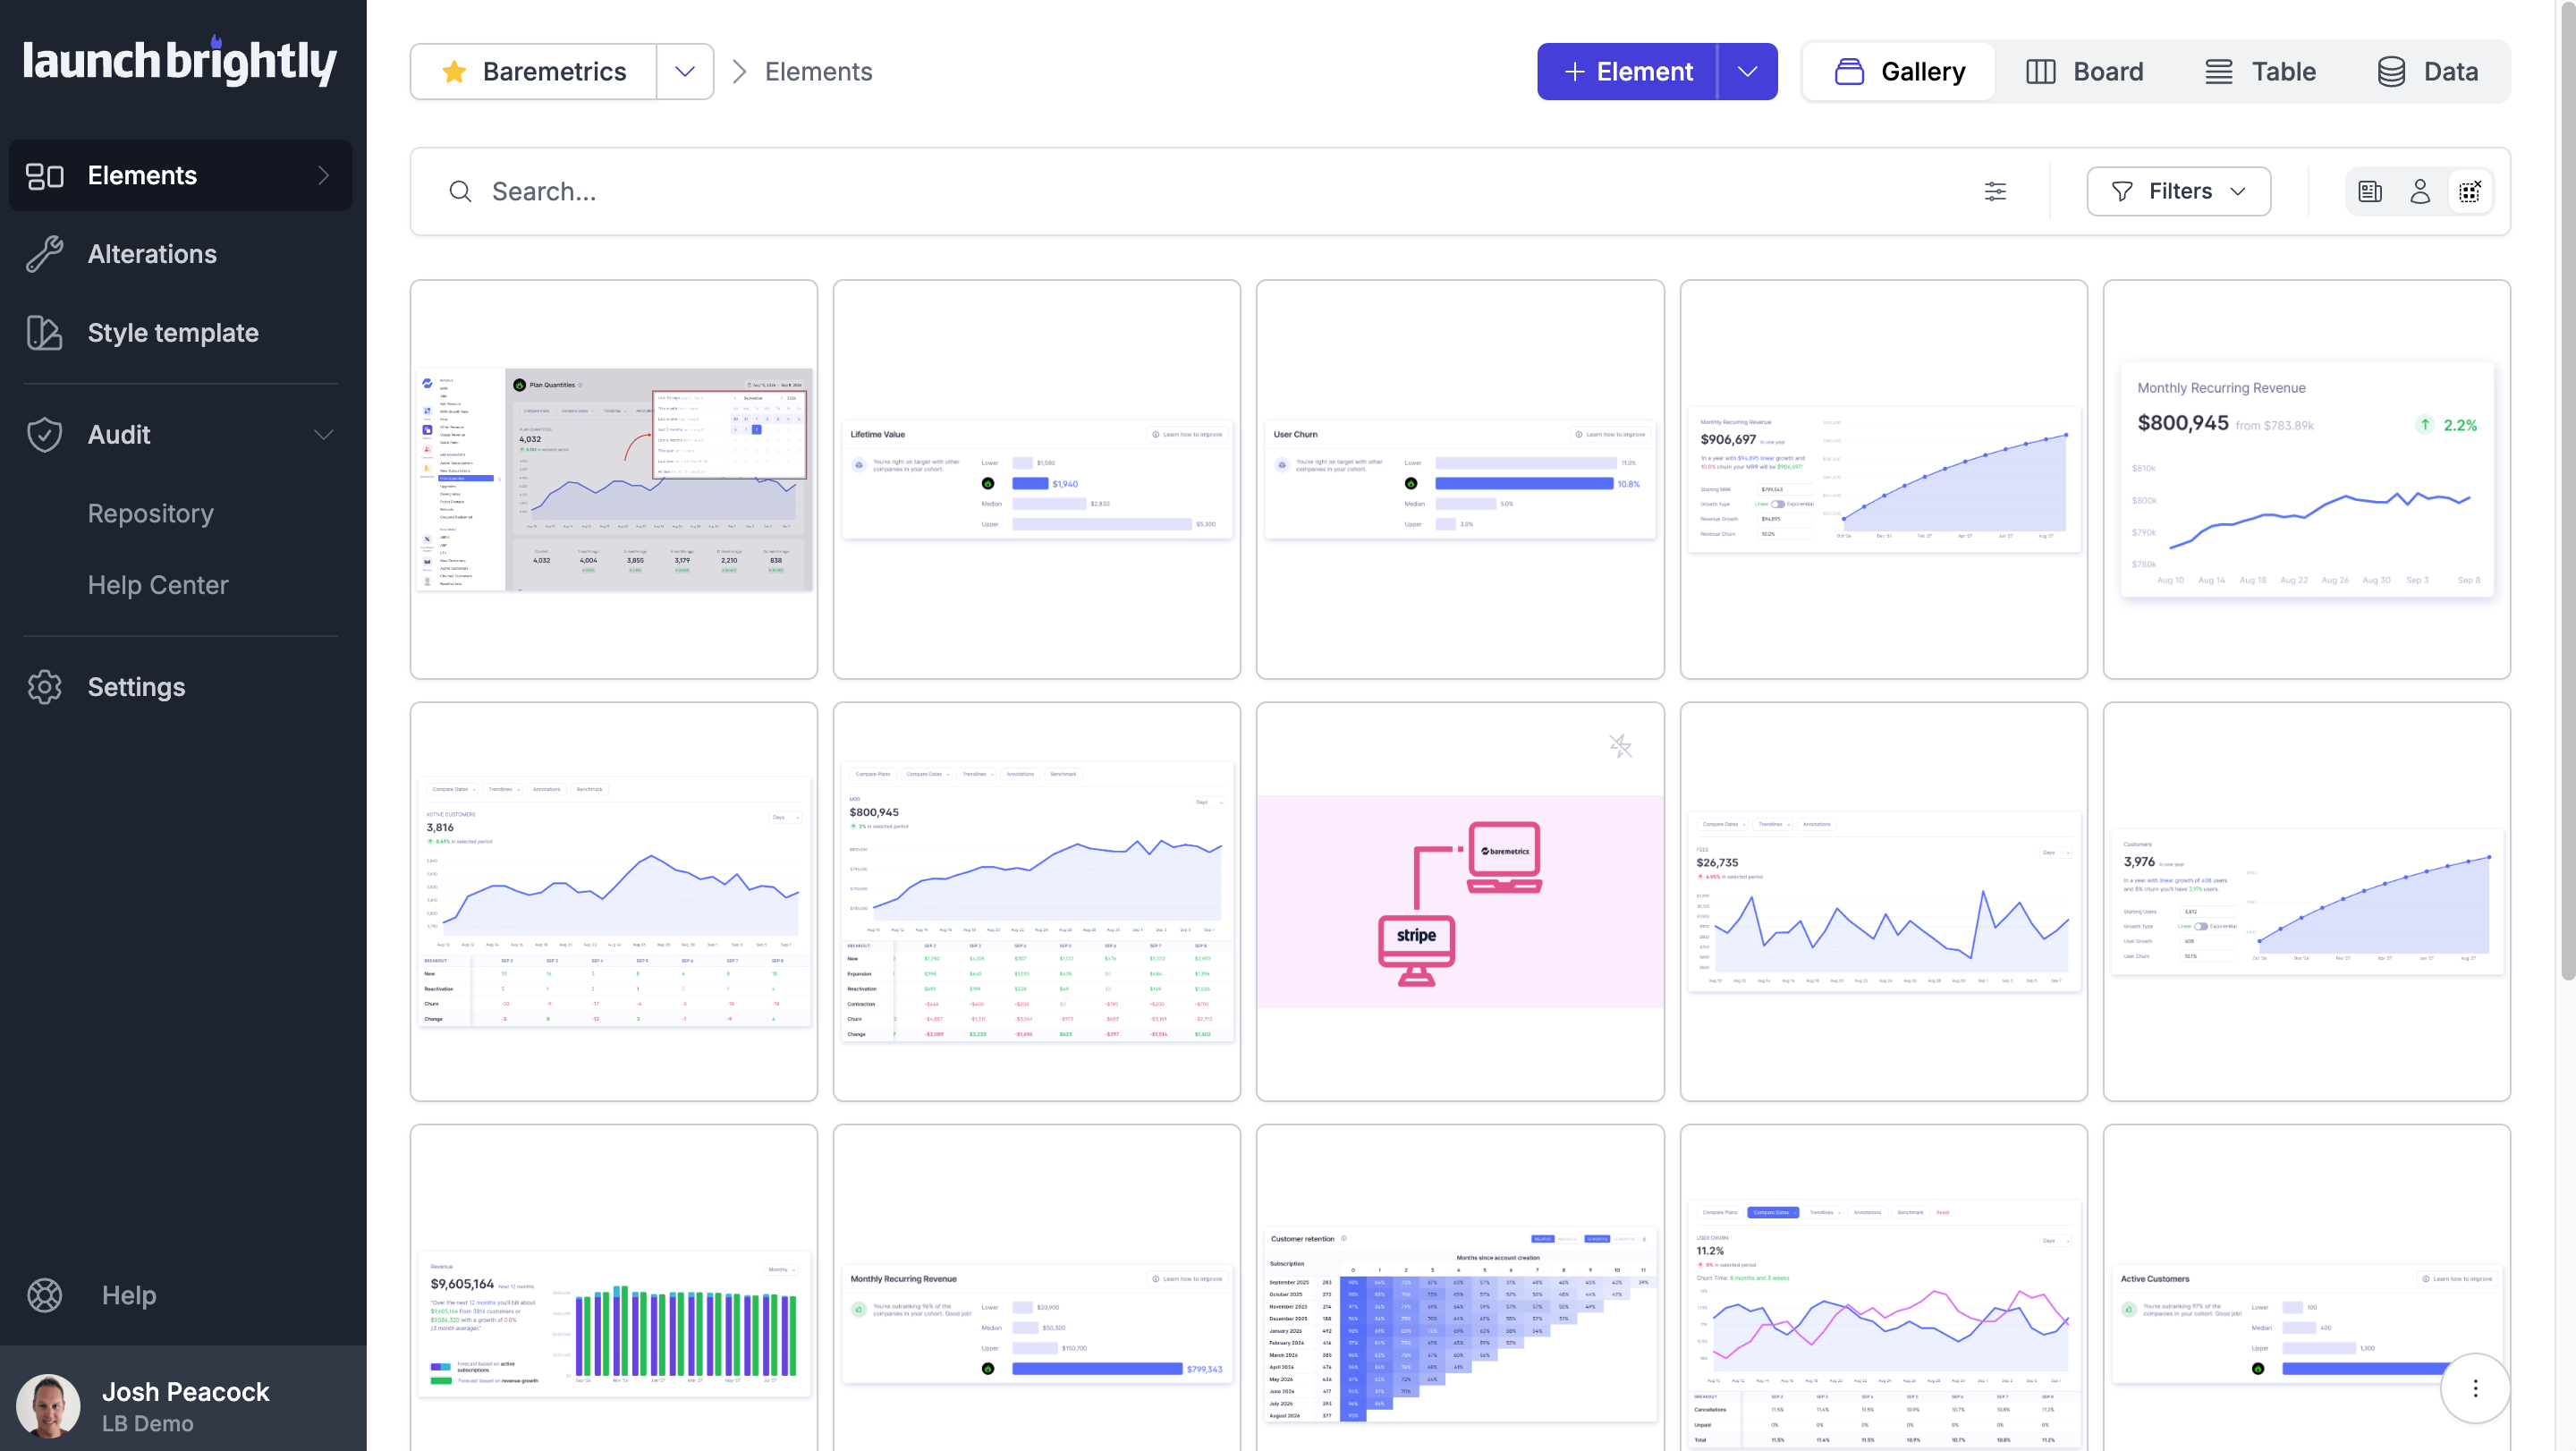
The initial import gives you something most documentation teams have never really had: a complete picture of the screenshots they’re actually maintaining.
Rather than simply copying a collection of images into another folder, the platform scans the screenshots across your help articles, identifies unique images, recognizes where the same screenshot has been reused, and maps those relationships back to the articles where each image appears.
The result is a centralized, searchable screenshot library that makes the scale of your existing visual documentation much easier to understand. A screenshot that appears across five different articles is no longer five unrelated files someone has to remember to maintain — it’s one visual asset with five known relationships across your help center.
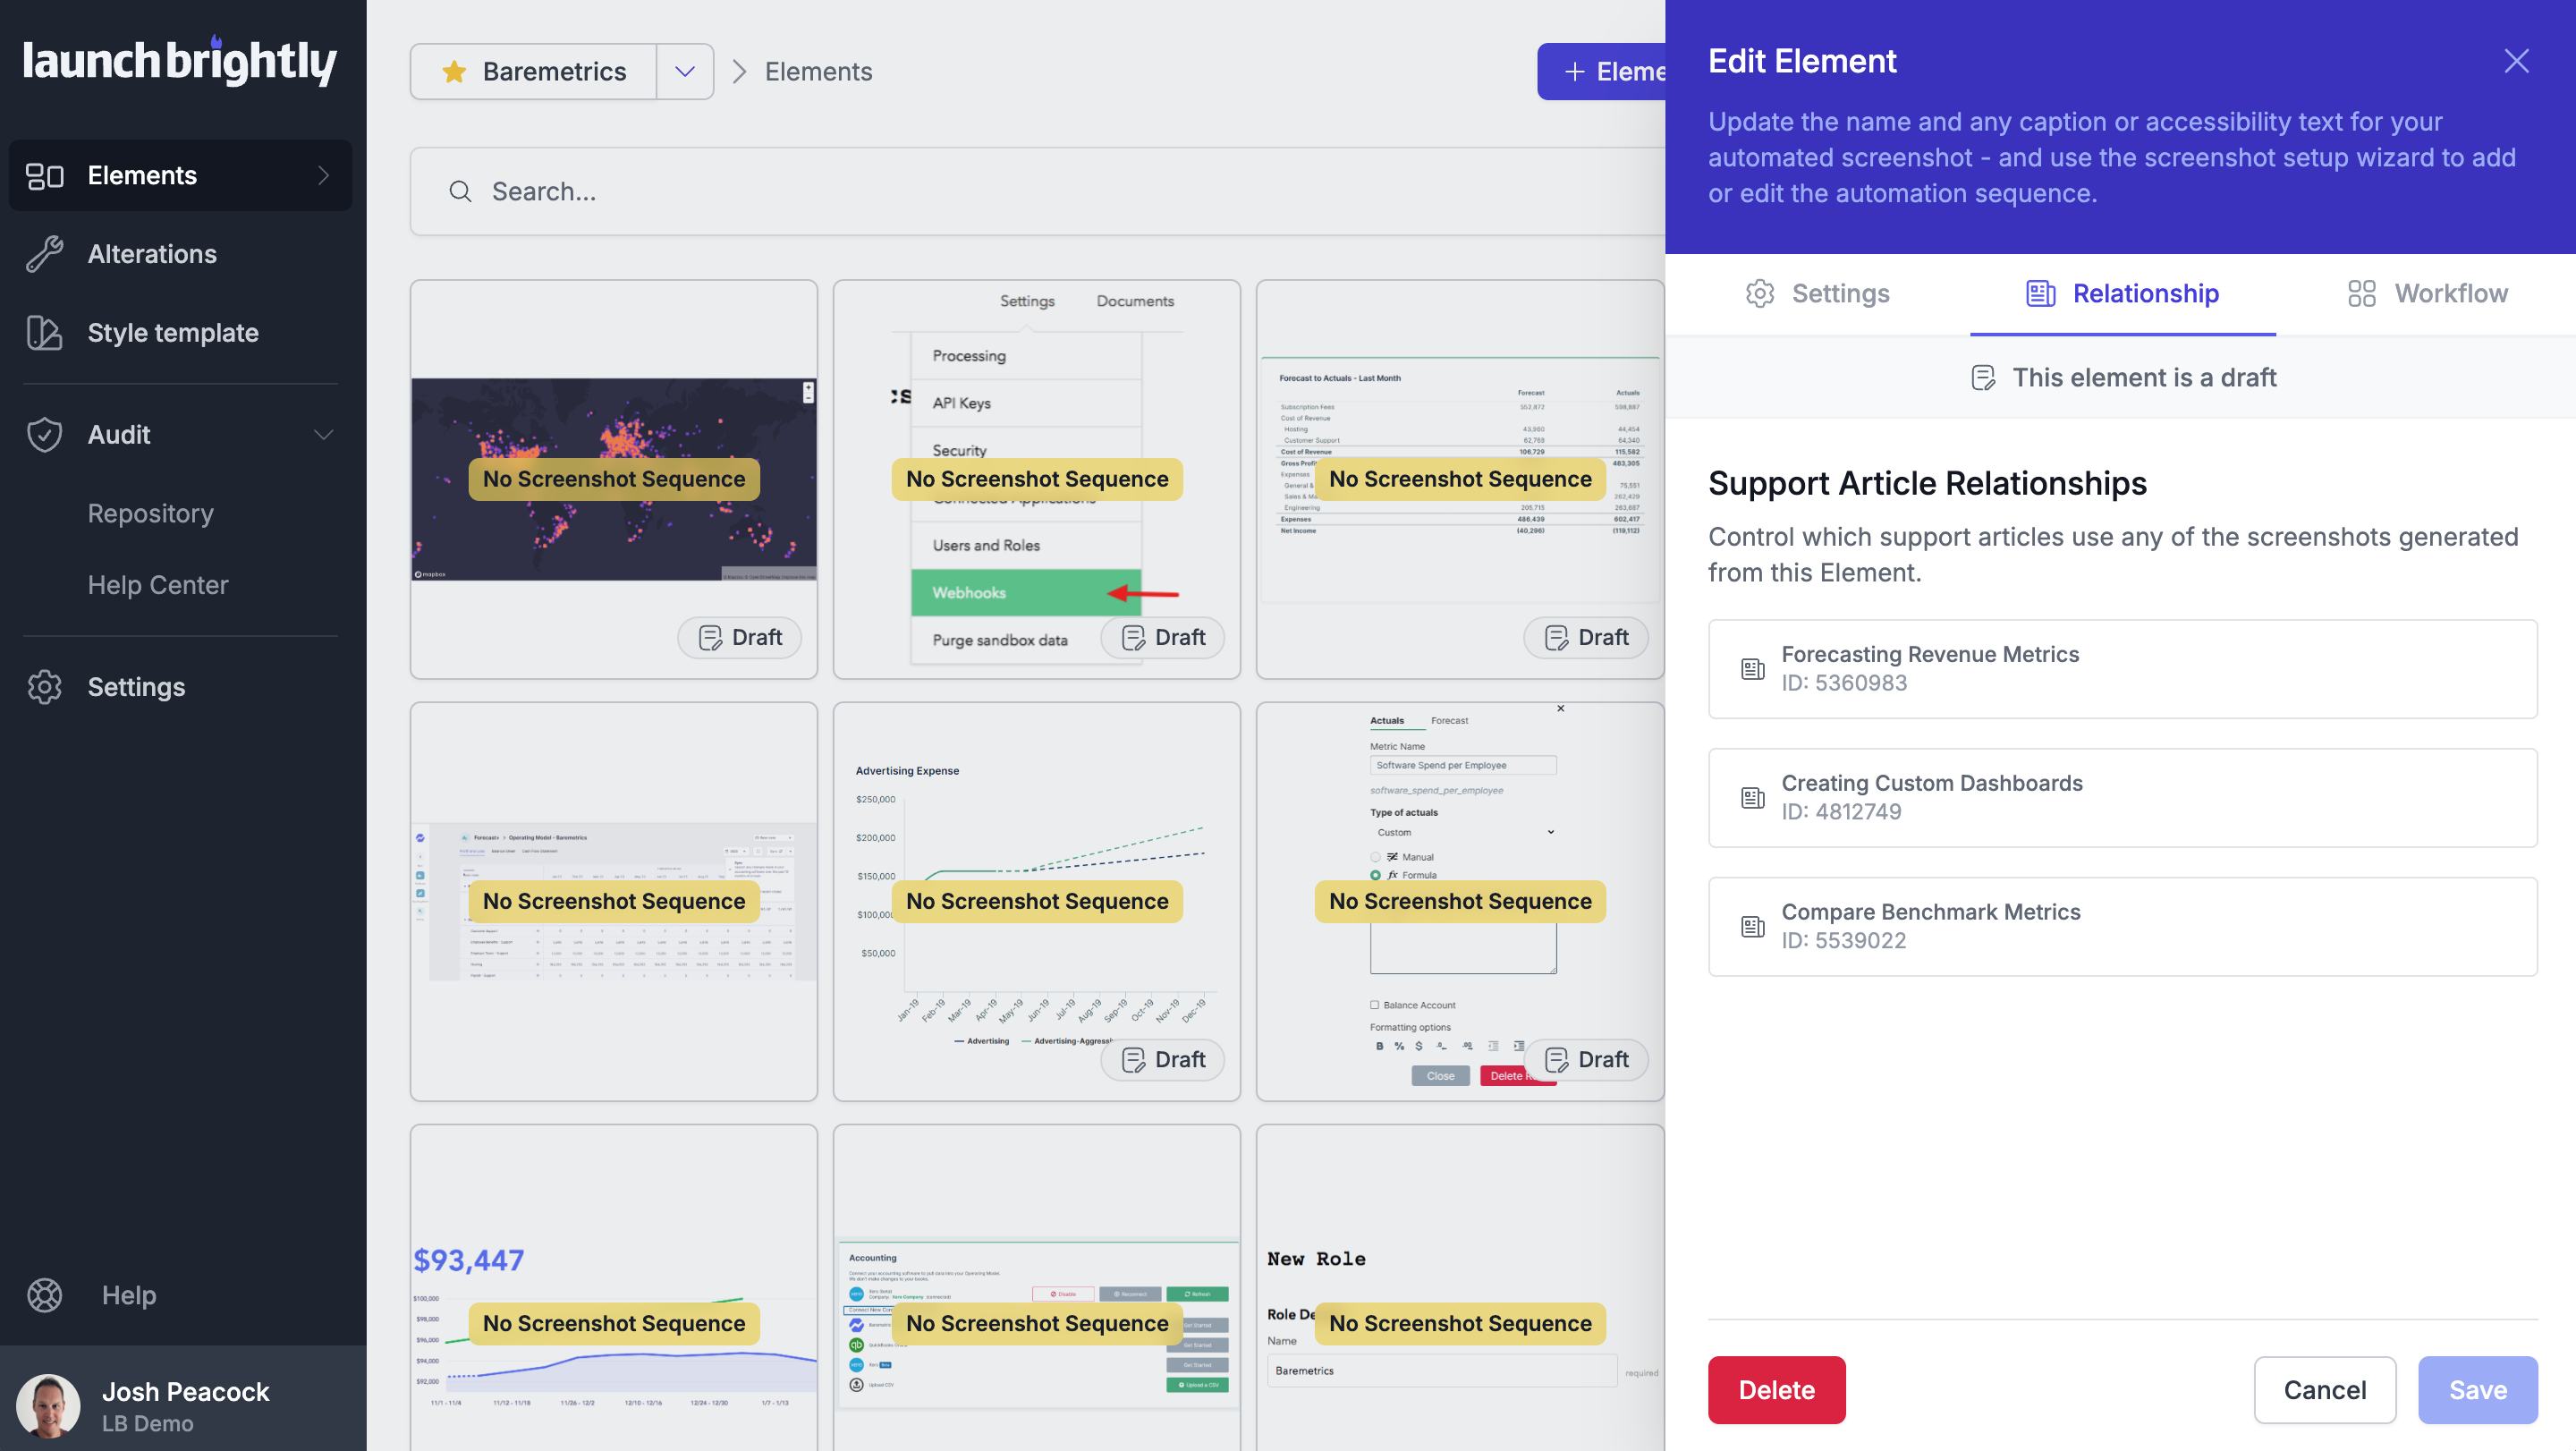
For many teams, this is where things get interesting. For the first time, you can see the true scope of the product visuals across your documentation — including just how often the same screenshots are being reused.
It’s a surprisingly useful view of your help center in its own right. No hunting through hundreds of articles, no manual tracking spreadsheets, and no more wondering what you missed.
Configure your styling template and alterations
Your screenshot styling tends to evolve organically rather than deliberately, and it rarely gets noticed while it's happening. Each individual image can look perfectly reasonable on its own — the inconsistency only becomes apparent when screenshots are viewed together across the help center.
None of those individual choices were necessarily wrong. But together, they create a visual language that shifts from article to article — and over time, that inconsistency can make your documentation feel less cohesive than it should.
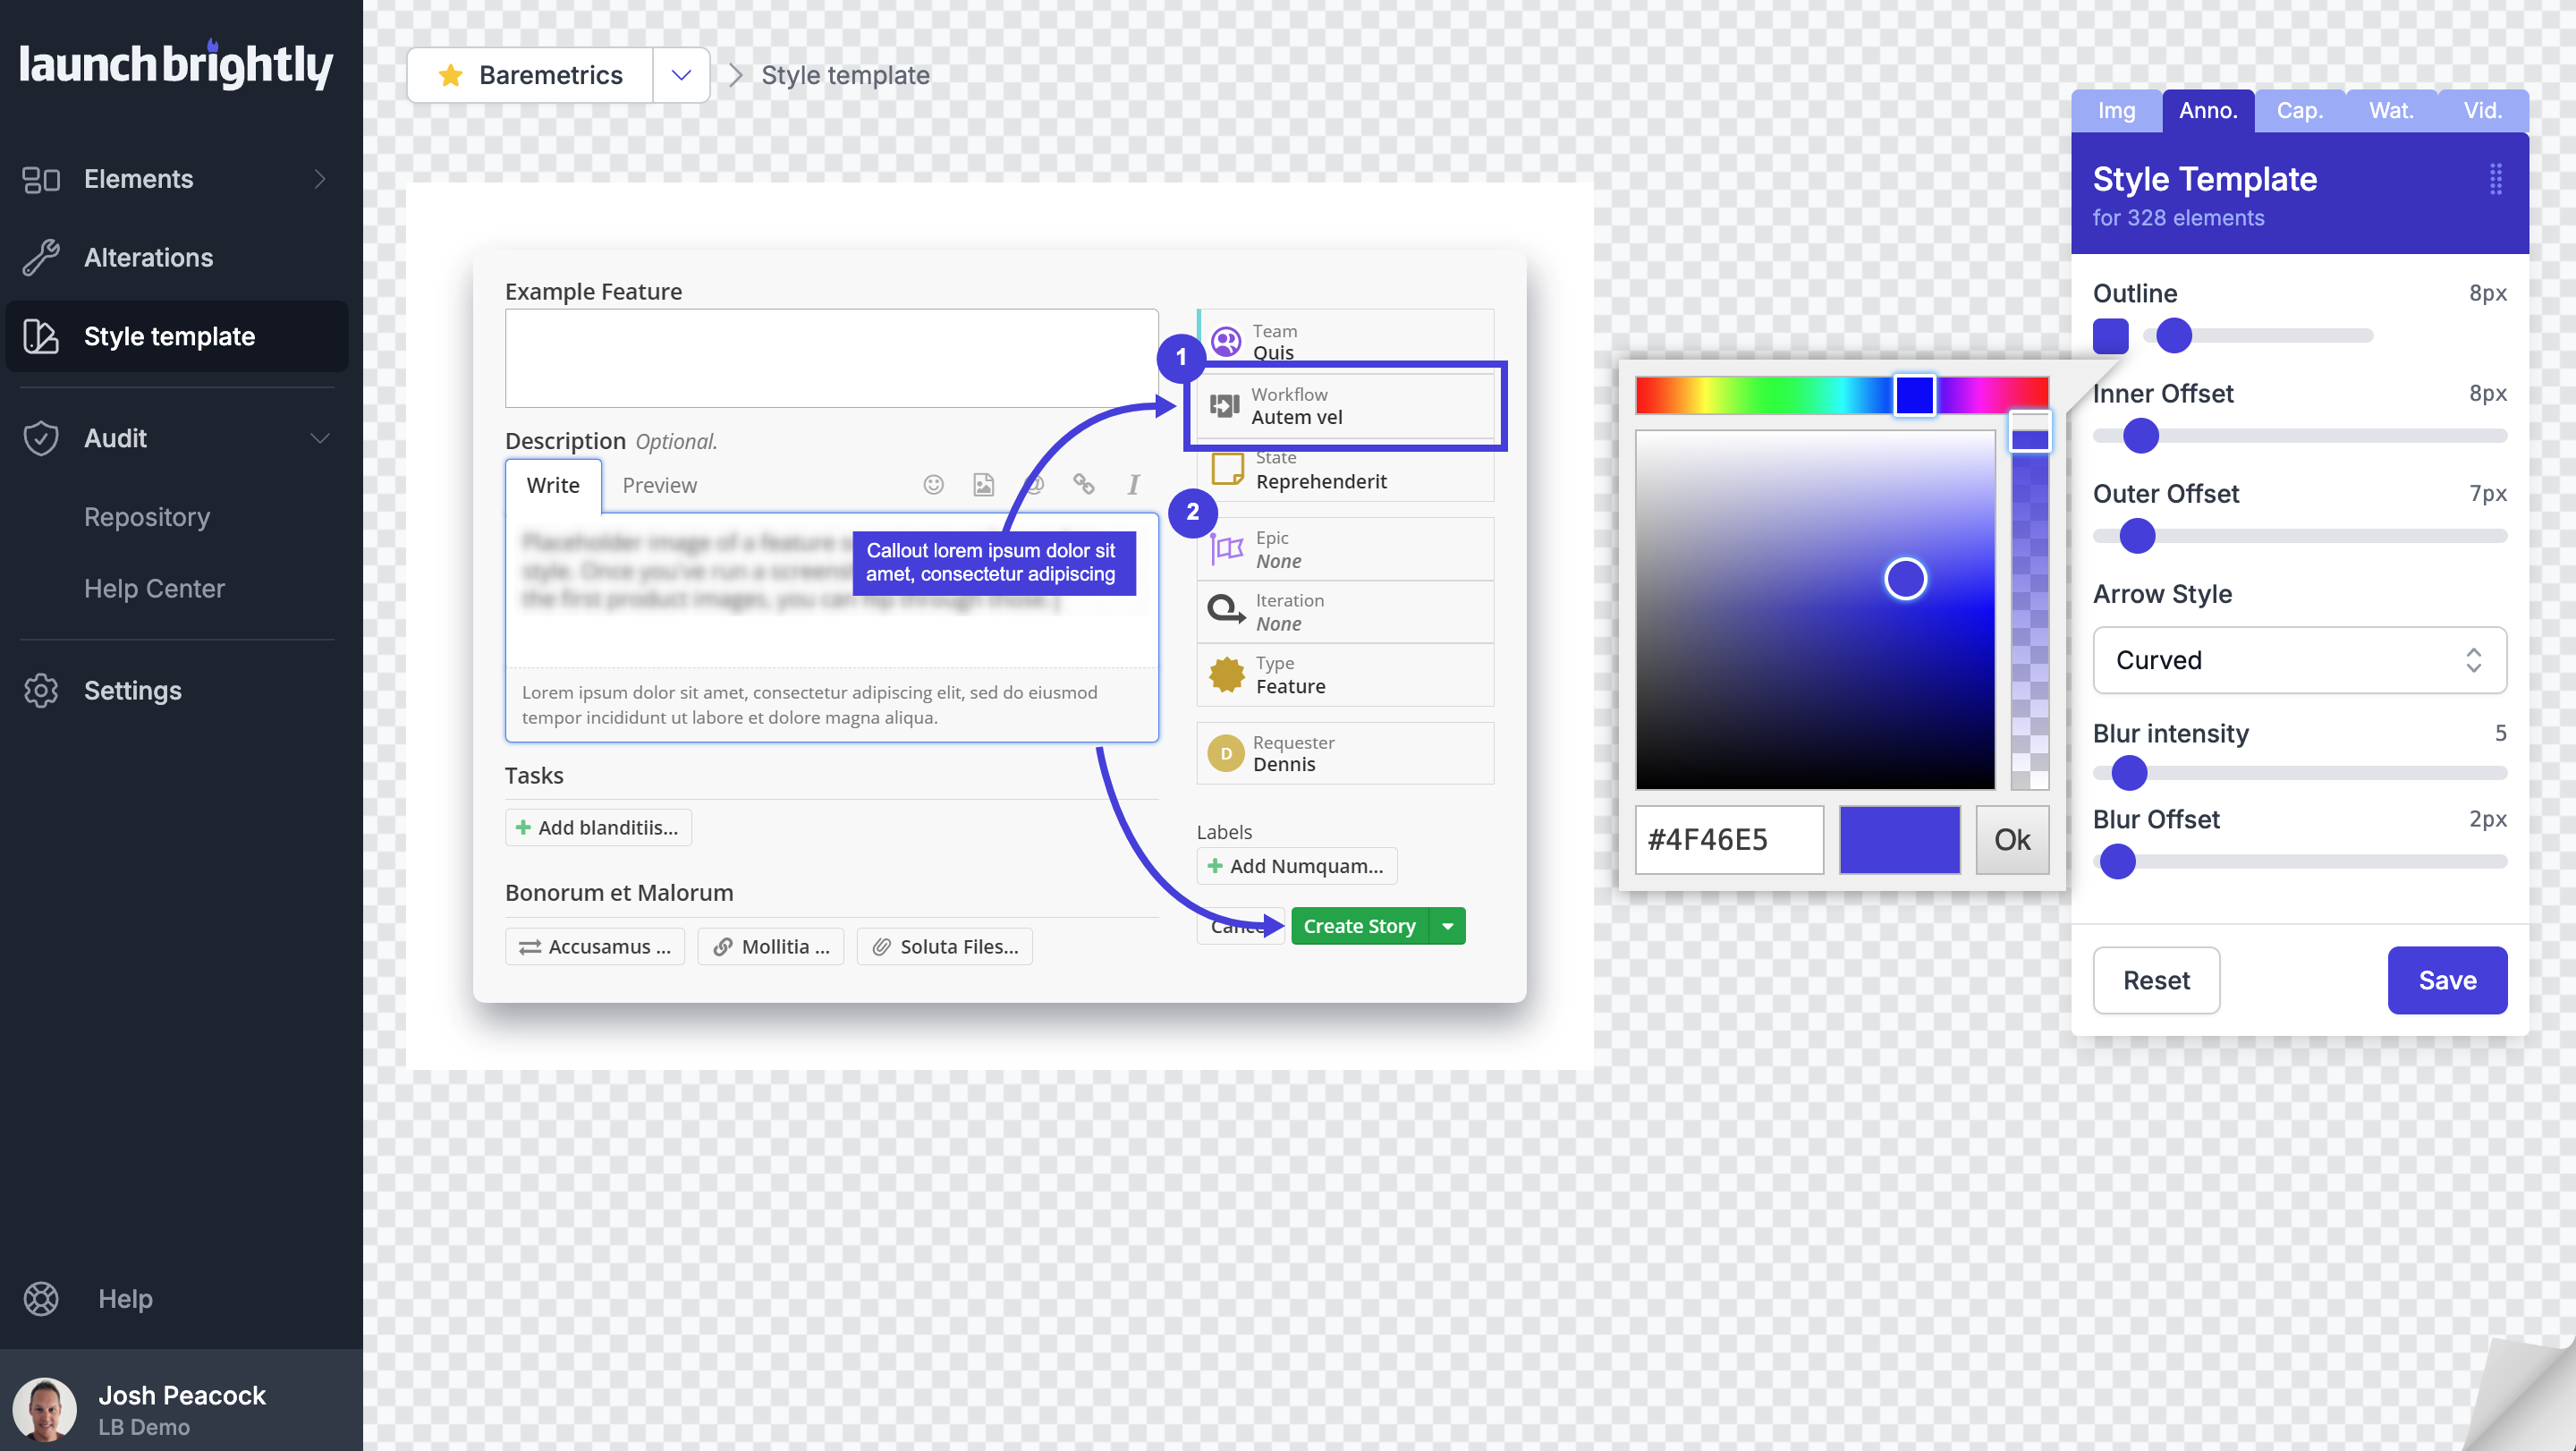
The simplest way to avoid that drift is to centralize those decisions. Rather than asking every author to remember which colors, margins, or outline widths to use, you establish those standards once and apply them automatically across every screenshot you generate.
Defining a custom Style Template gives you centralized control over how your screenshots look, including:
- Annotation colors and styles
- Margin sizing and colors
- Transparent, solid, or gradient backgrounds
- Rounded corners and shadows
- Annotation offsets and line thickness
- Straight or curved annotation arrows
- Caption and watermark configurations
Every screenshot stays consistent with your visual standards — no matter who captures it, or when. And when those standards change, you're not restyling screenshots one by one. Update your Style Template once, reprocess your screenshots, and the new styling is automatically applied — whether it’s a minor adjustment to an annotation or a broader change to your brand.
Styling controls how your screenshots look. Alterations help control what's actually in them — and just as often, what shouldn't be.
Every product has UI elements that make sense inside the application but don't necessarily belong in public documentation: cookie banners, chat widgets, feature announcement labels, environment warnings, or other interface elements that are useful in-product but distracting in a help article.
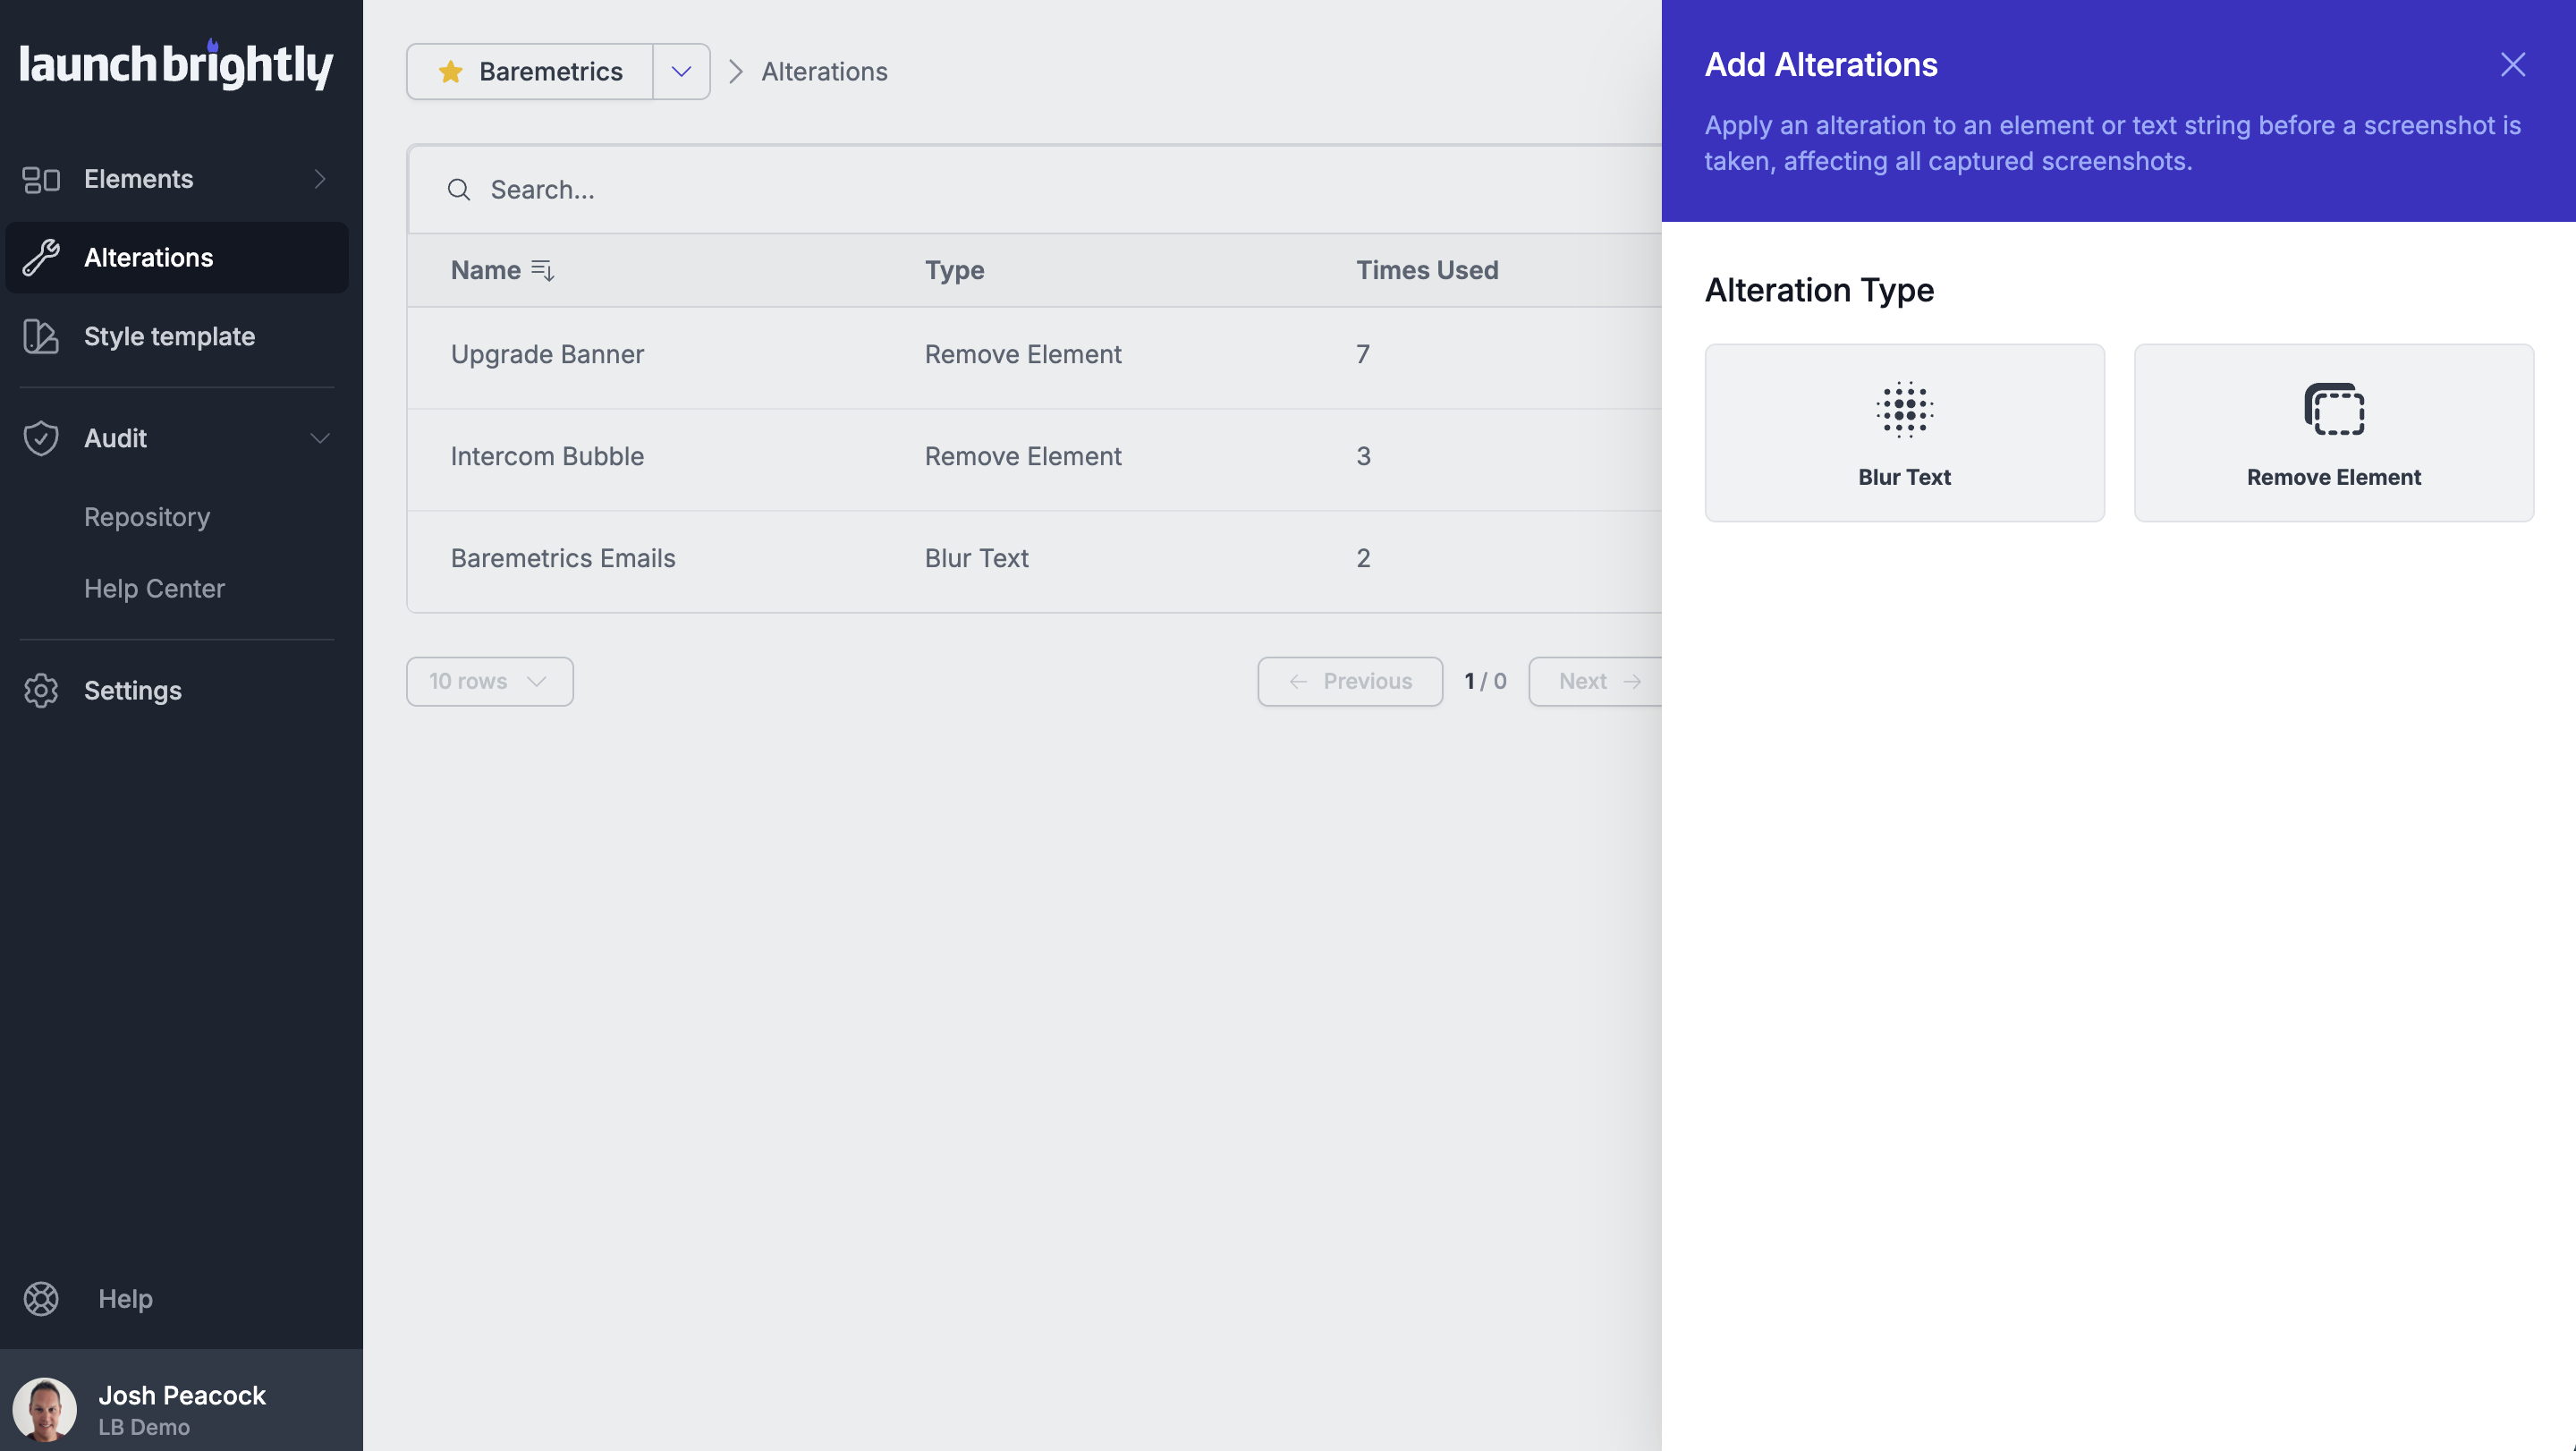
Rather than manually editing those elements out of every screenshot, you can configure a Remove Element alteration once and have it automatically applied whenever that element appears during screenshot capture.
Blur alterations work on the same principle, applied to information rather than interface elements. They can obscure anything you'd rather keep out of frame, with common examples including email addresses, user-specific details, or other account information you don't want appearing in public documentation.
Together, your Style Template and alterations turn those visual decisions into reusable rules. The screenshot doesn't just get regenerated automatically — it comes back styled, cleaned up, and ready for your documentation the same way, every time.
Create a Login Profile and generate your first screenshots
With your styling and alterations configured, the next step is configuring how the screenshot automation platform securely signs into your product.
You configure a fully customizable Login Profile for the demo or staging environment you want to capture from. It signs in just like a regular user, giving the platform secure access behind your product login without custom APIs, plugins, or engineering involvement.
To your application, it simply looks like another authenticated user signing in and using the product.
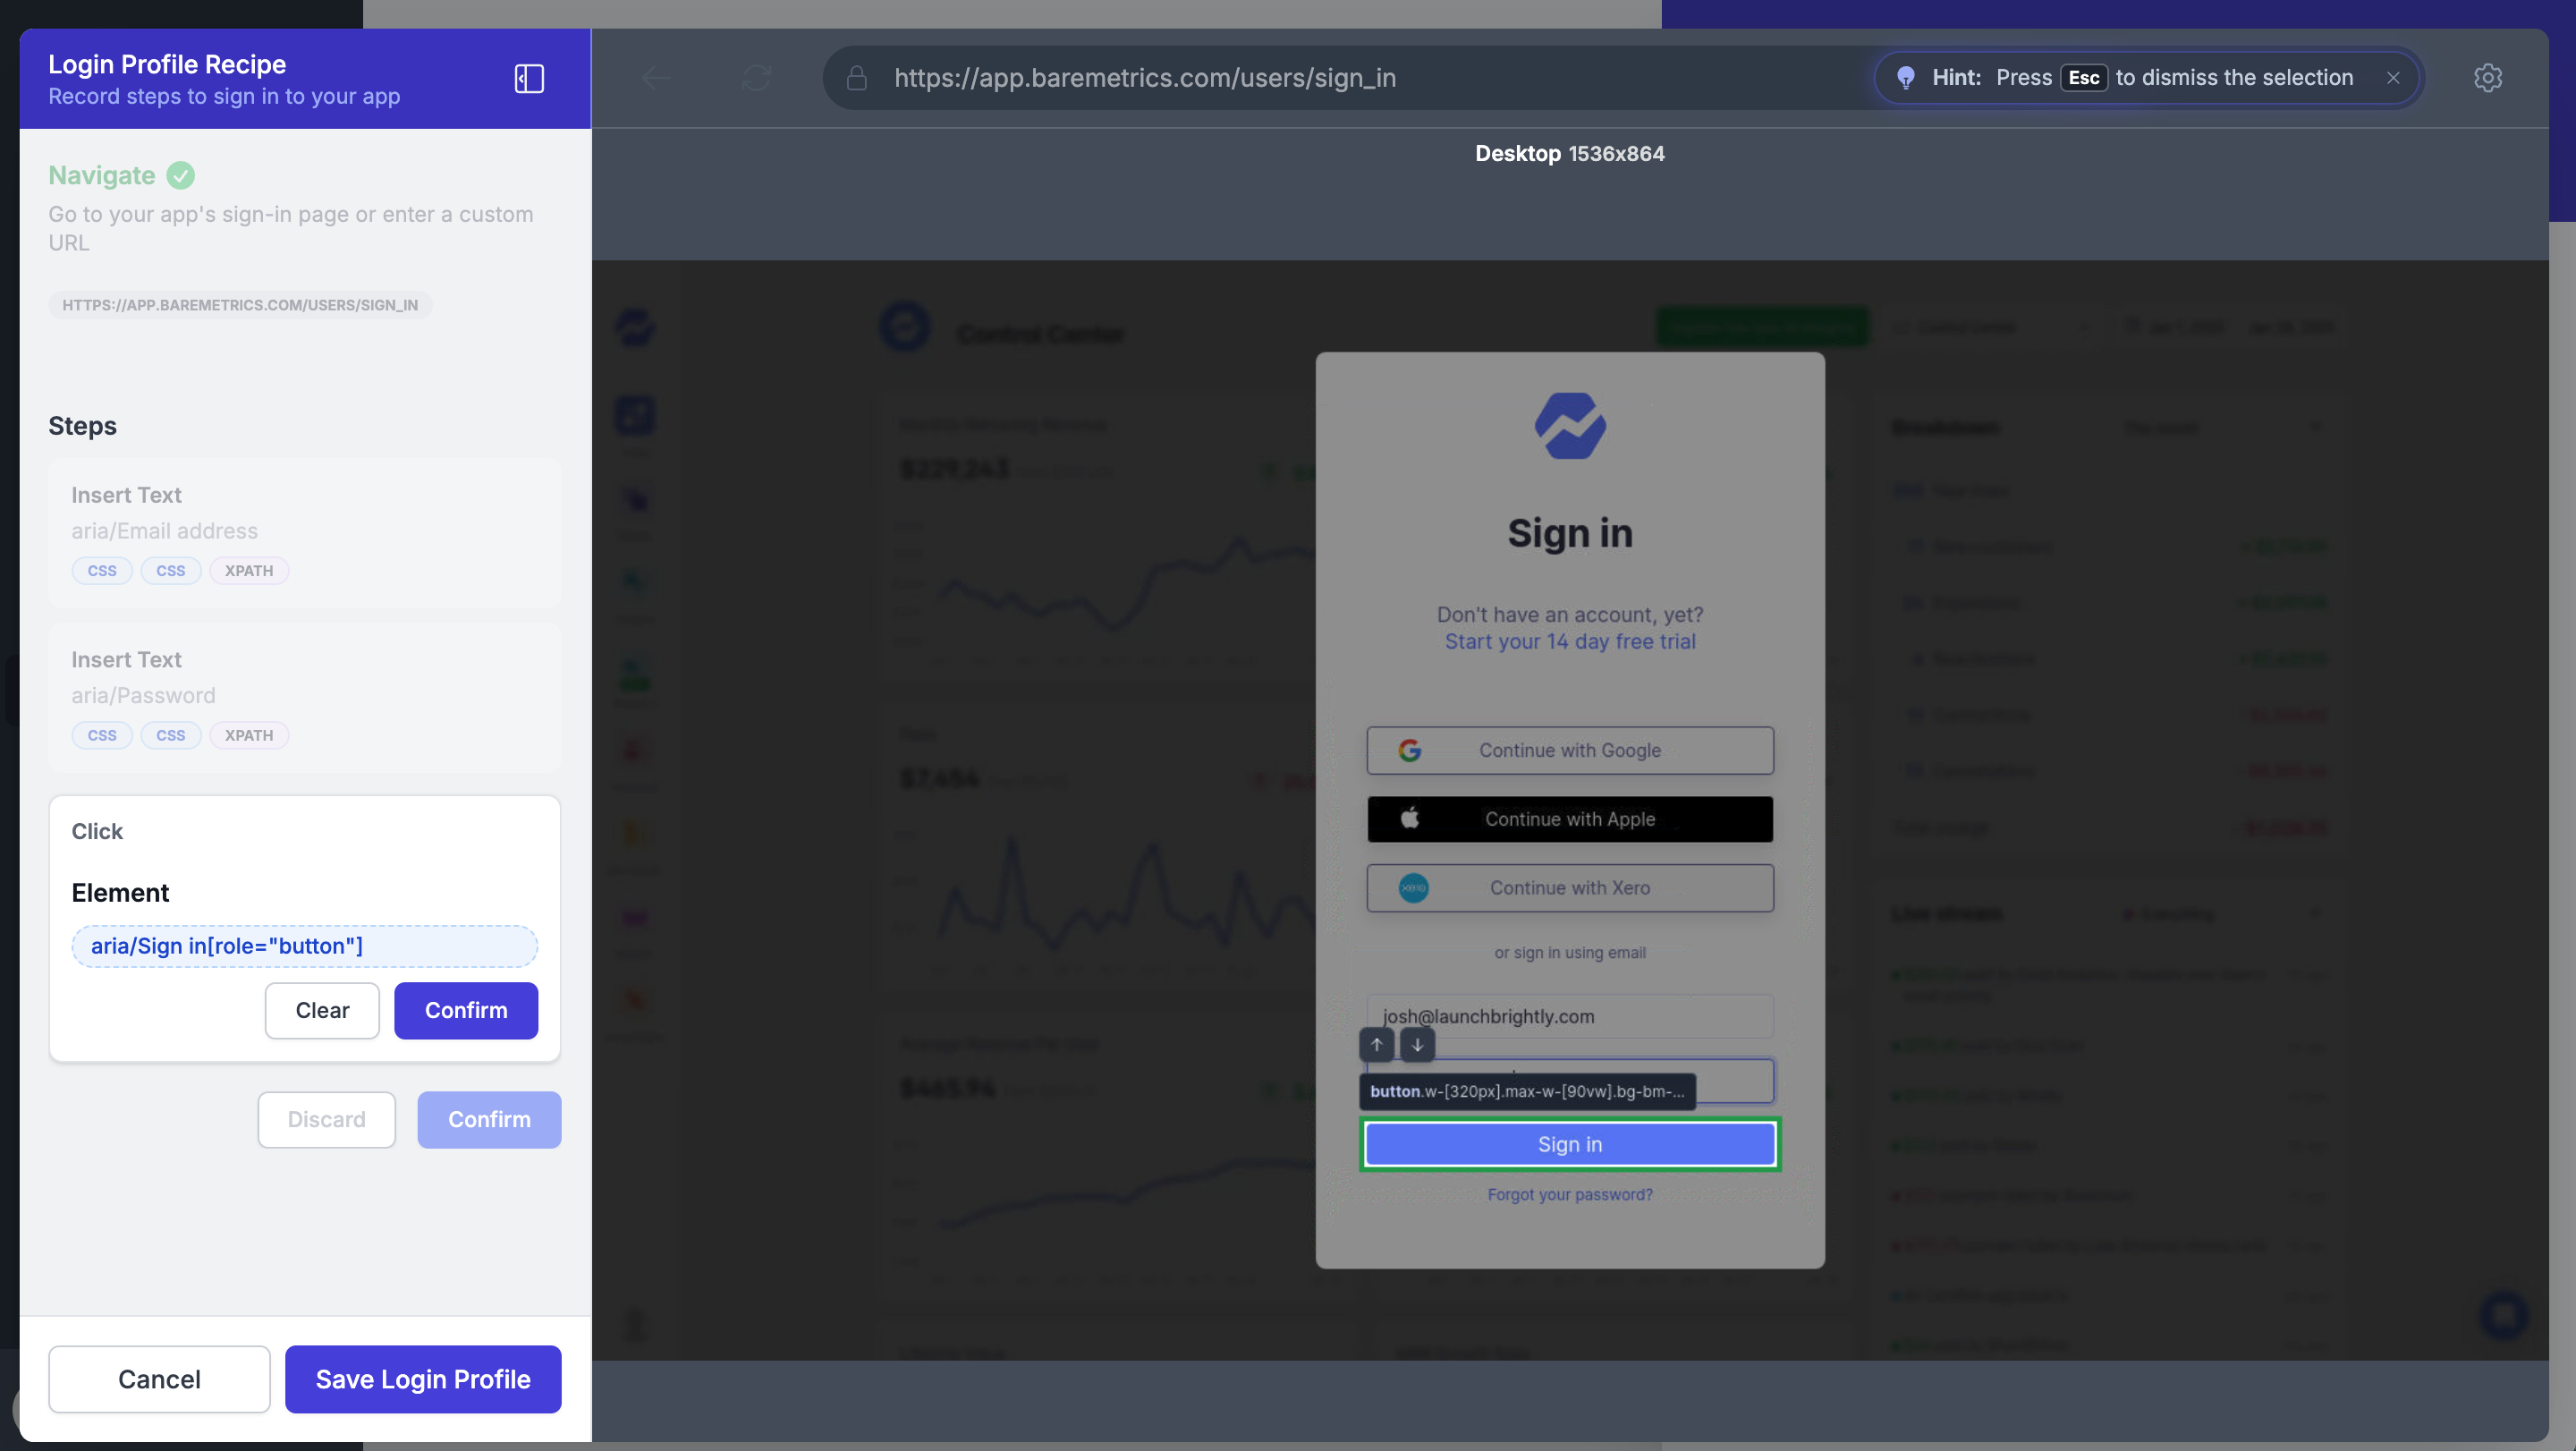
Once configured, that same Login Profile is reused across your automation recipes, so you’re not re-entering credentials or rebuilding the authentication flow every time you want to generate a screenshot.
If your product has more than one logged-in experience, Multiple Login Profiles let you connect the different demo accounts or environments you need and switch between them when capturing screenshots — whether that’s across different plans, user roles, staging environments, or feature-flagged experiences. All of those screenshots still live in the same centralized repository and are managed through the same screenshot audit process.
With authentication in place, you can start turning the screenshots already in your documentation into reusable automation recipes. For a POC, that doesn’t mean automating your entire help center. A representative set of screenshots and product workflows is enough to put the complete process through its paces against the kinds of documentation you actually maintain.
Recording a recipe happens inside the NextGen Screenshot Recipe Builder — a fully functional browser-in-browser that runs inside the platform. Start a session and your application opens using the Login Profile you’ve already configured, ready for you to navigate exactly as you would in a normal browser.
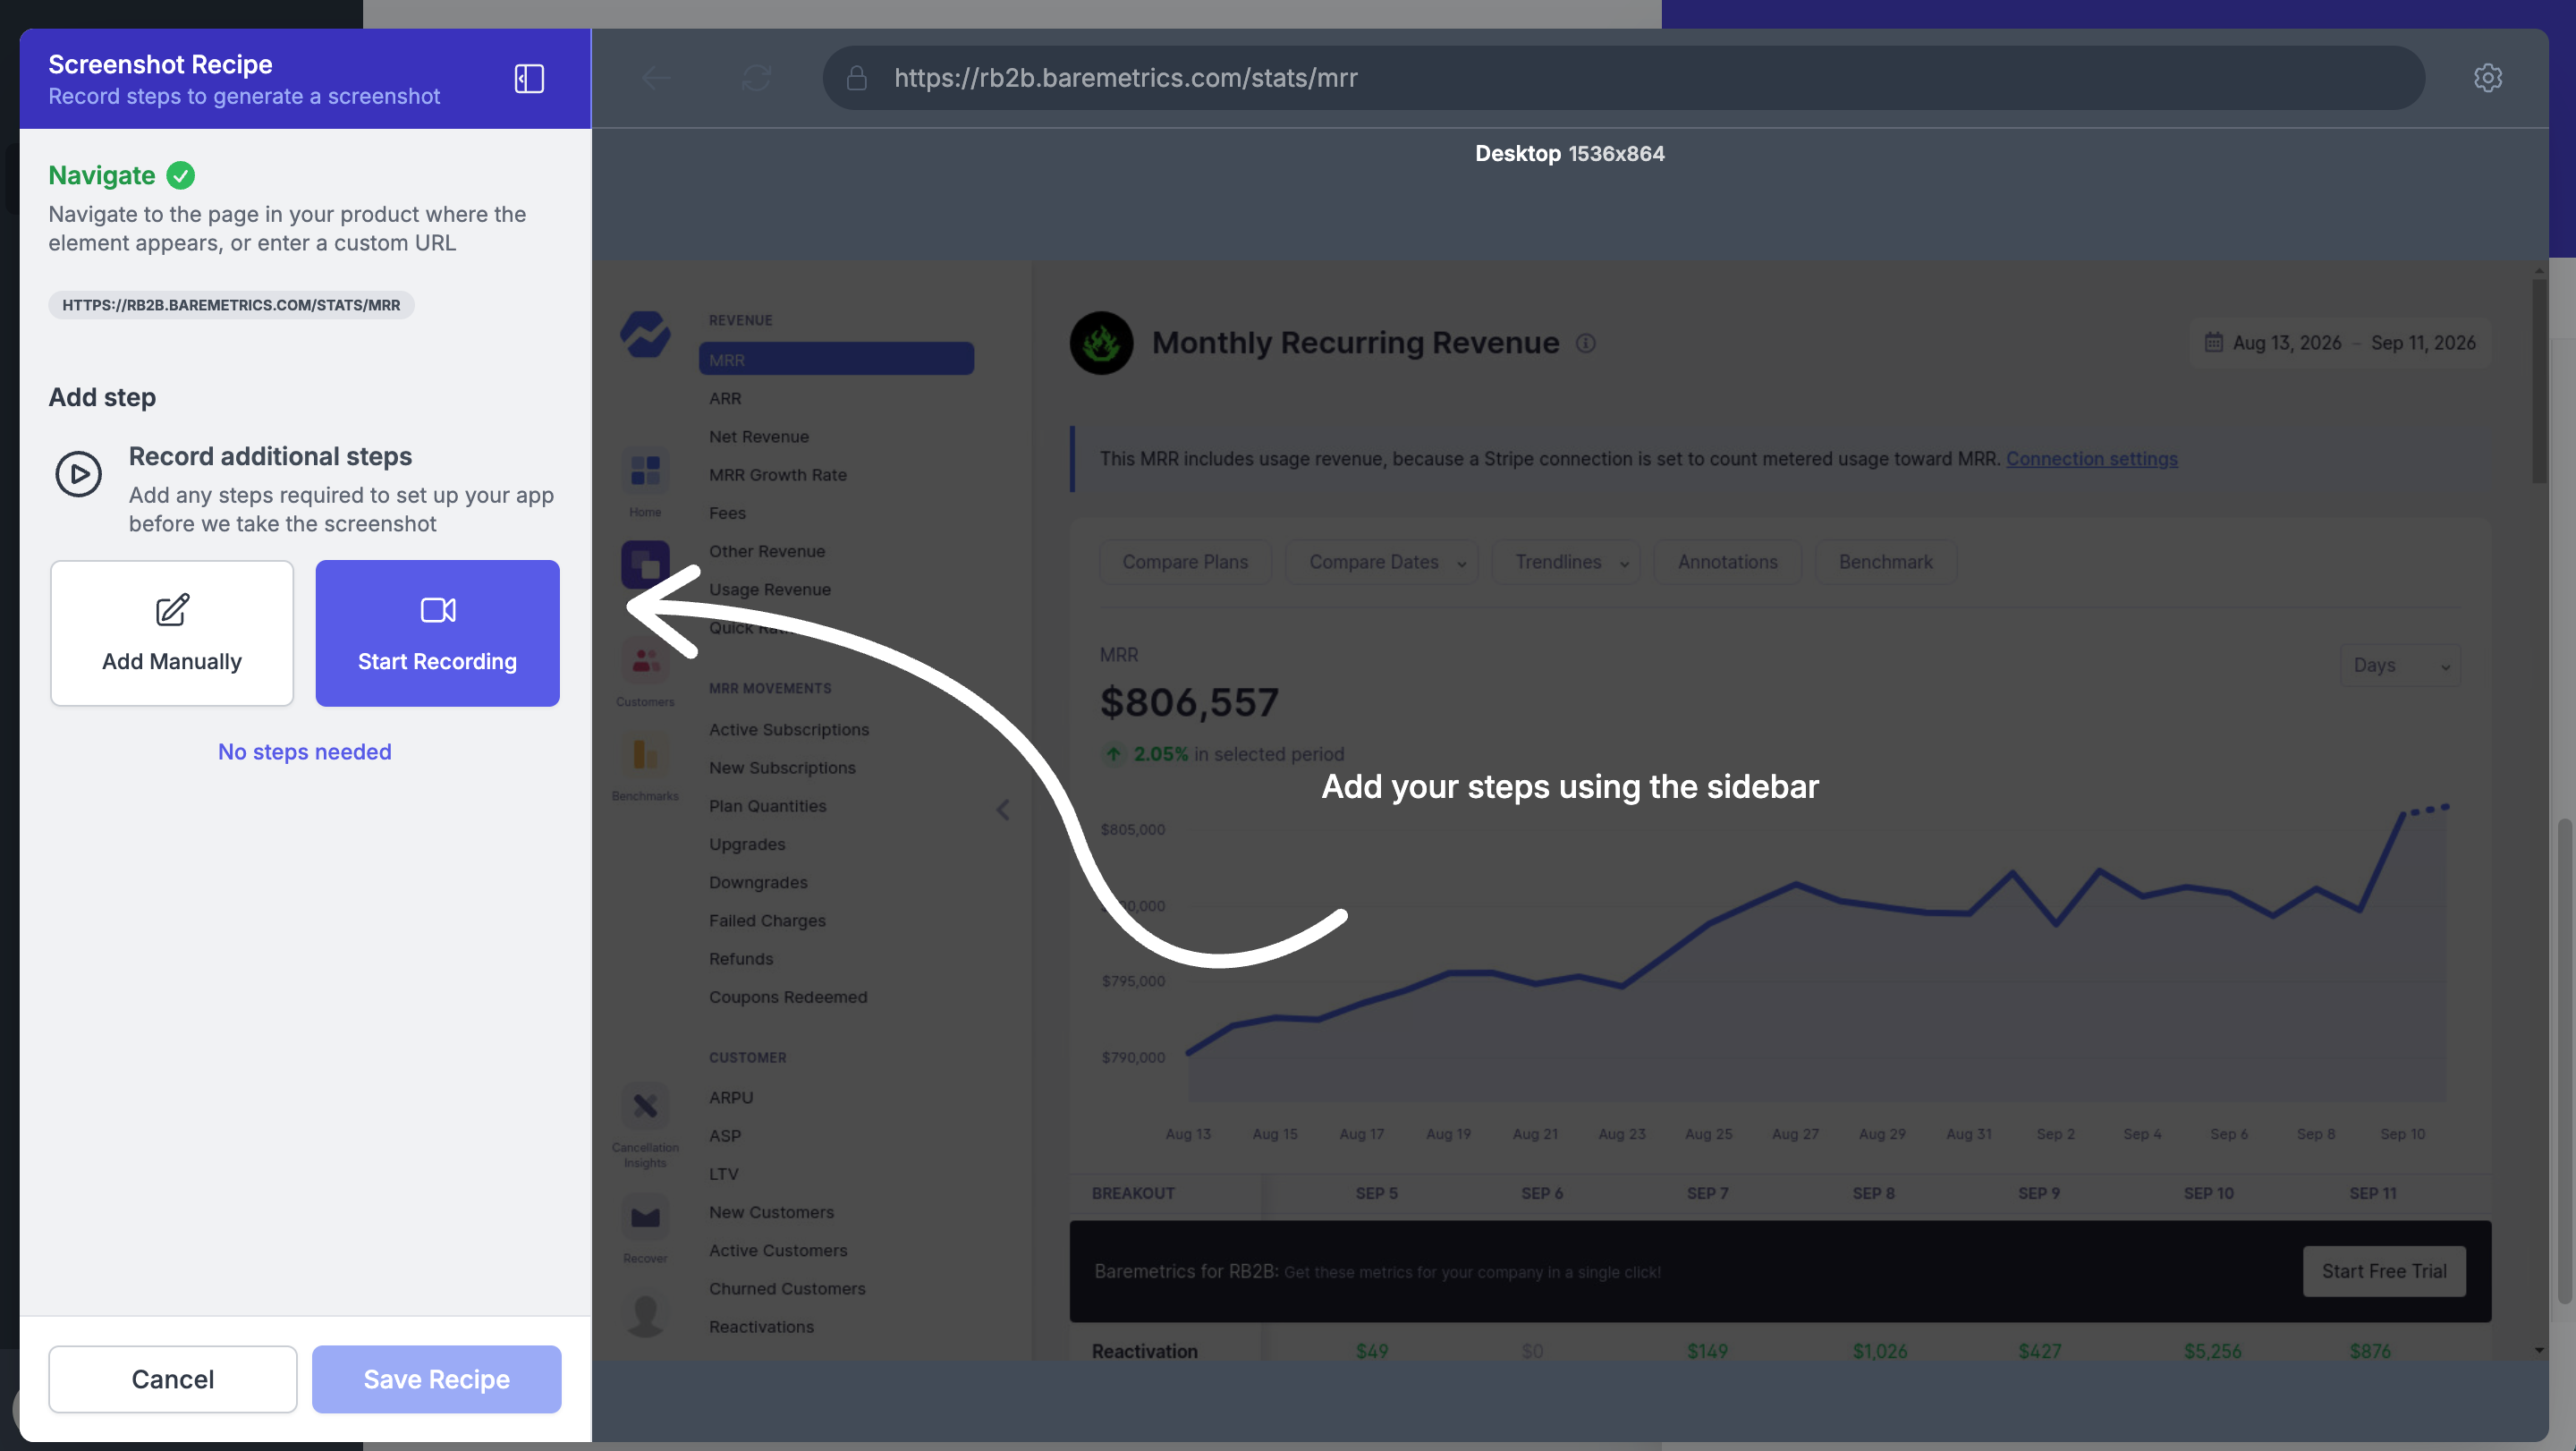
From there, you use the product naturally. Click buttons, open menus, enter text, sort a table, expand a panel — whatever actions are required to reach the exact product state you want to capture.
But this is more than a simple screen recording. Every interaction is captured and assembled into a reusable automation recipe. What looks like a normal sequence of clicks becomes a repeatable workflow that can be executed again and again to generate a fresh version of that screenshot whenever you need it.
While recording, you can also add annotations, shapes, callouts, and other screenshot enhancements that become part of the recipe itself. They aren’t manual edits that need to be recreated every time the screenshot changes. They become part of the automation and are applied again whenever the screenshot is regenerated.
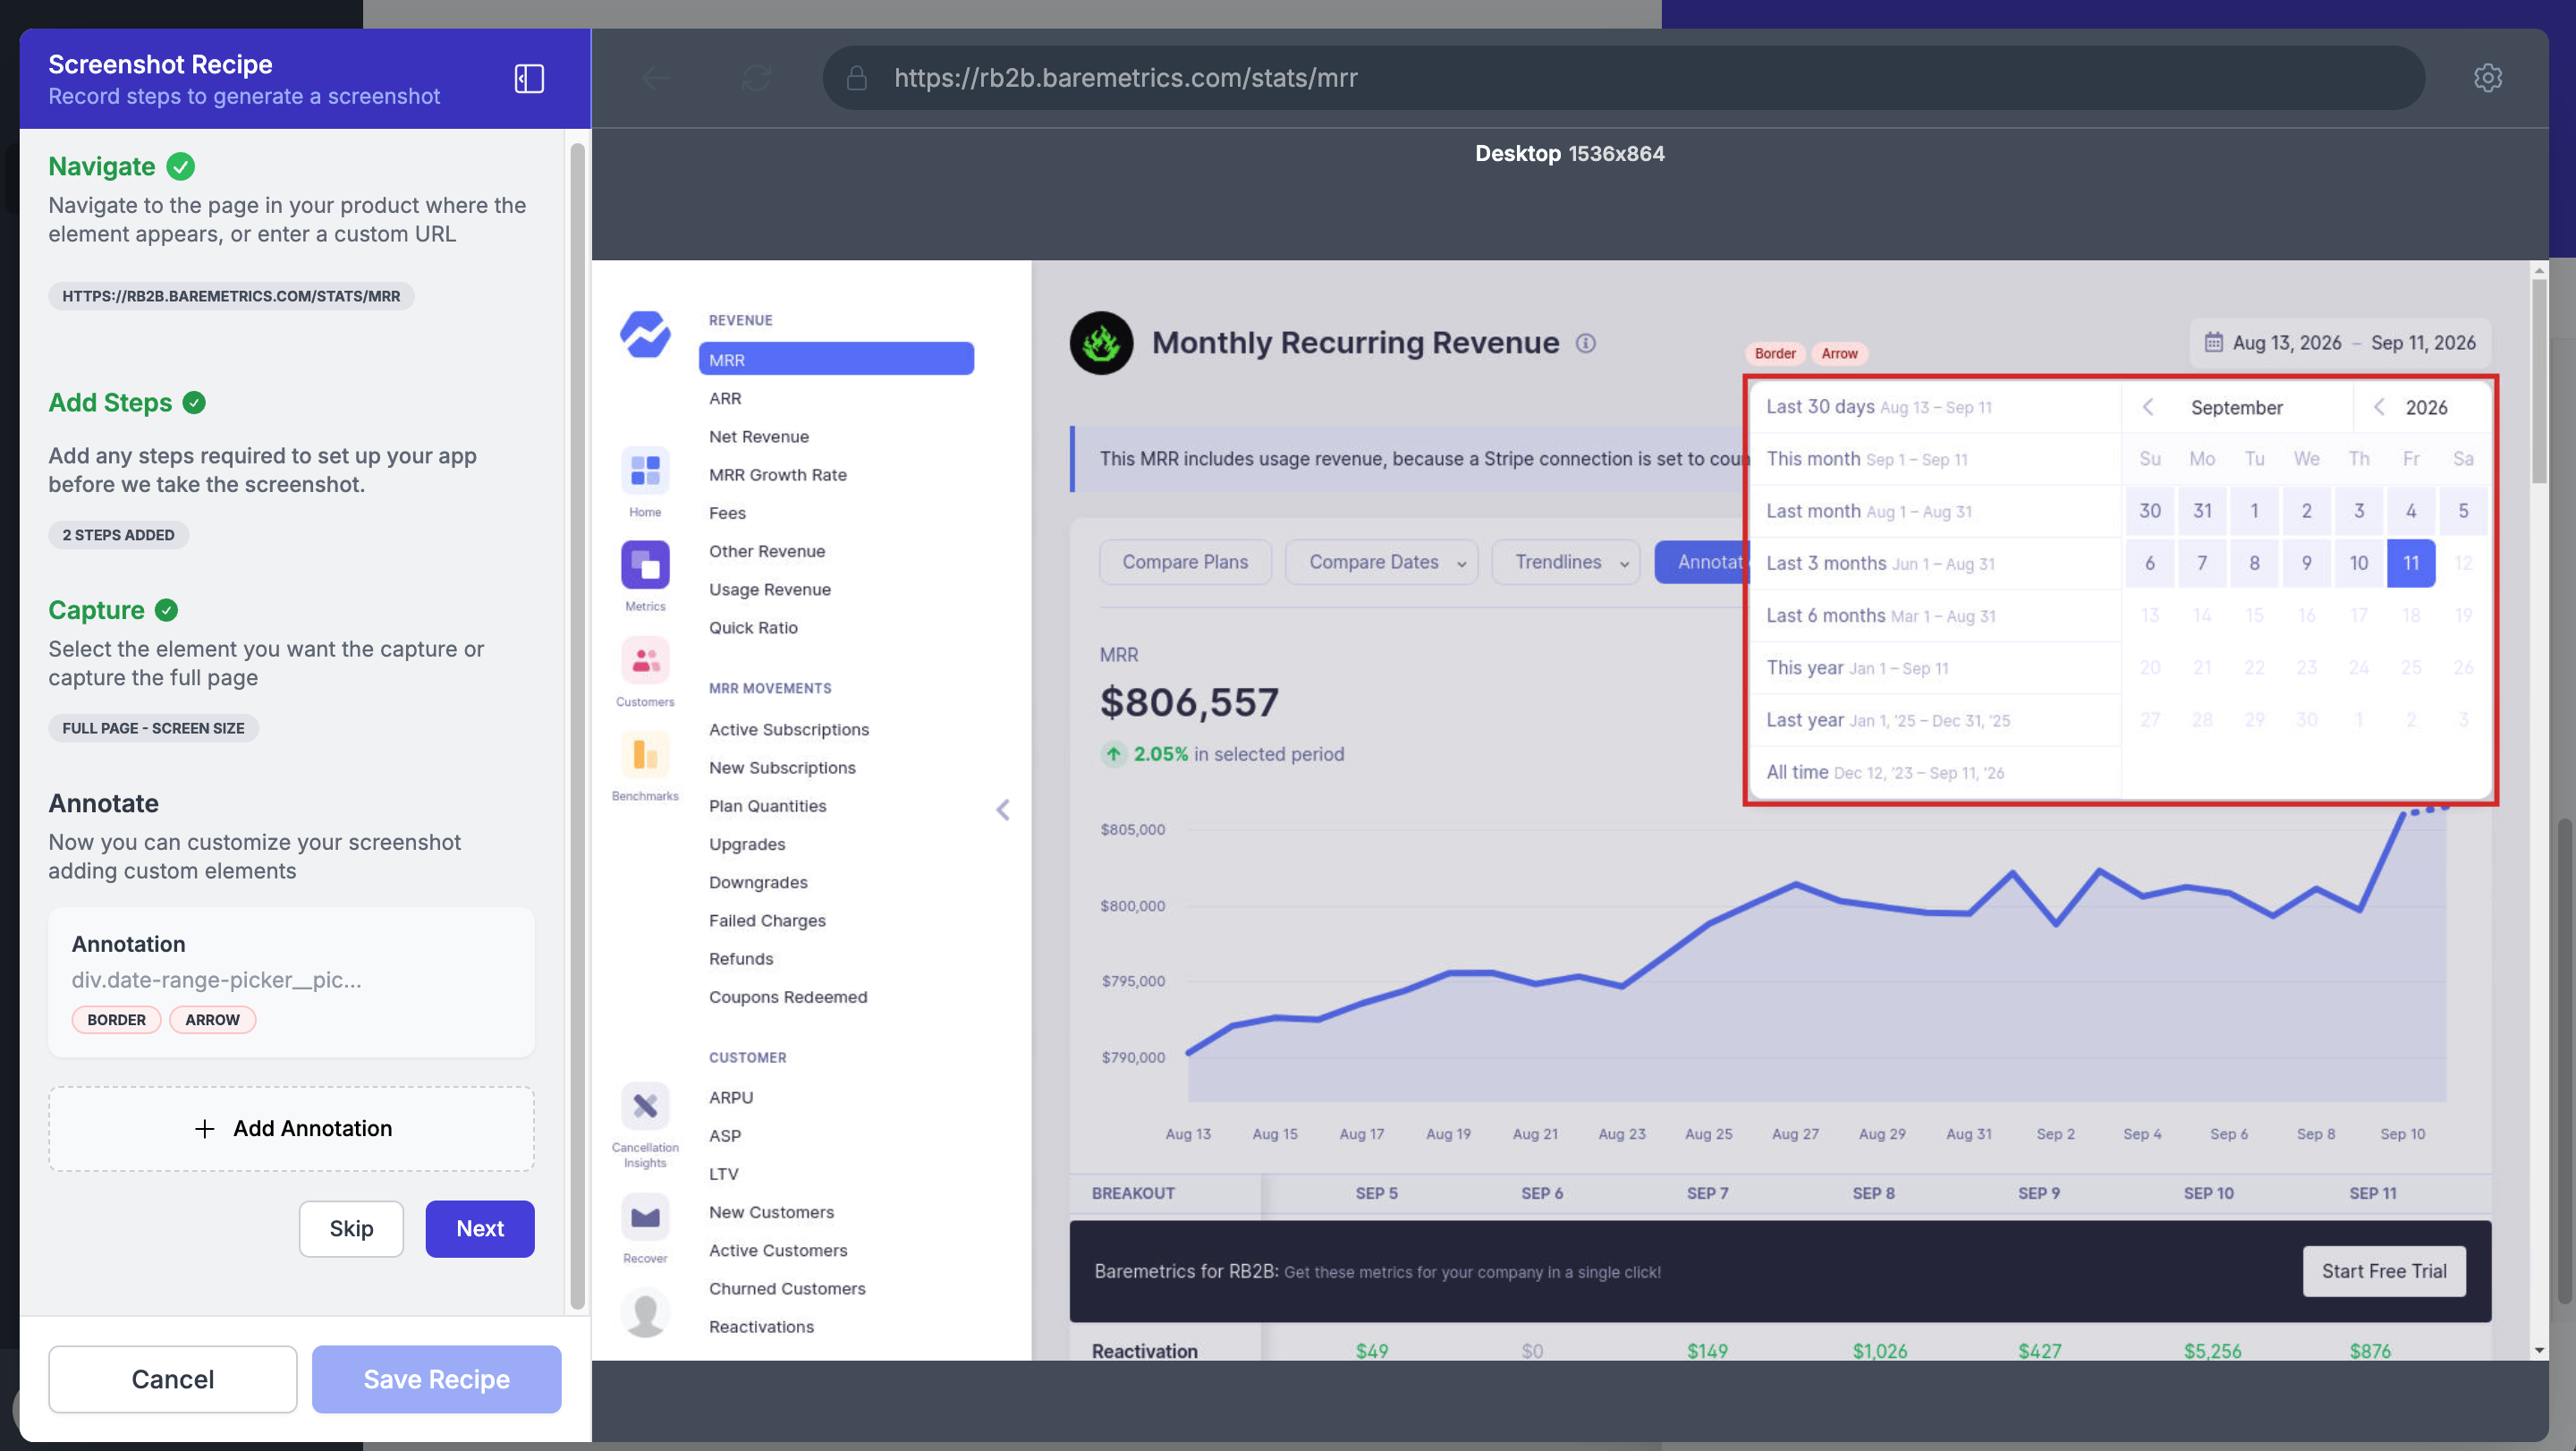
This is where screenshot automation really starts to come to life. You’re no longer creating another static image that will eventually need to be recreated — you’re creating a repeatable process that can generate that screenshot again and again, whenever your product changes.
Once the recipe has been recorded, reprocess it and you can immediately see the fresh output — confirming that the workflow has been reproduced, the intended product state captured, and your styling and enhancements applied correctly.
If everything looks right, move the recipe from Draft to Active, bringing it into your ongoing automation and recurring screenshot audit process.
Run a help center audit and sync your first screenshots
With your first automation recipes active, the final part of the POC is running your first screenshot audit — where all the pieces you’ve put in place come together. Audits are the foundation of ongoing screenshot governance, and this first run shows the full workflow working end to end: from screenshot generation and change detection through to review, approval, and sync back to your help center.
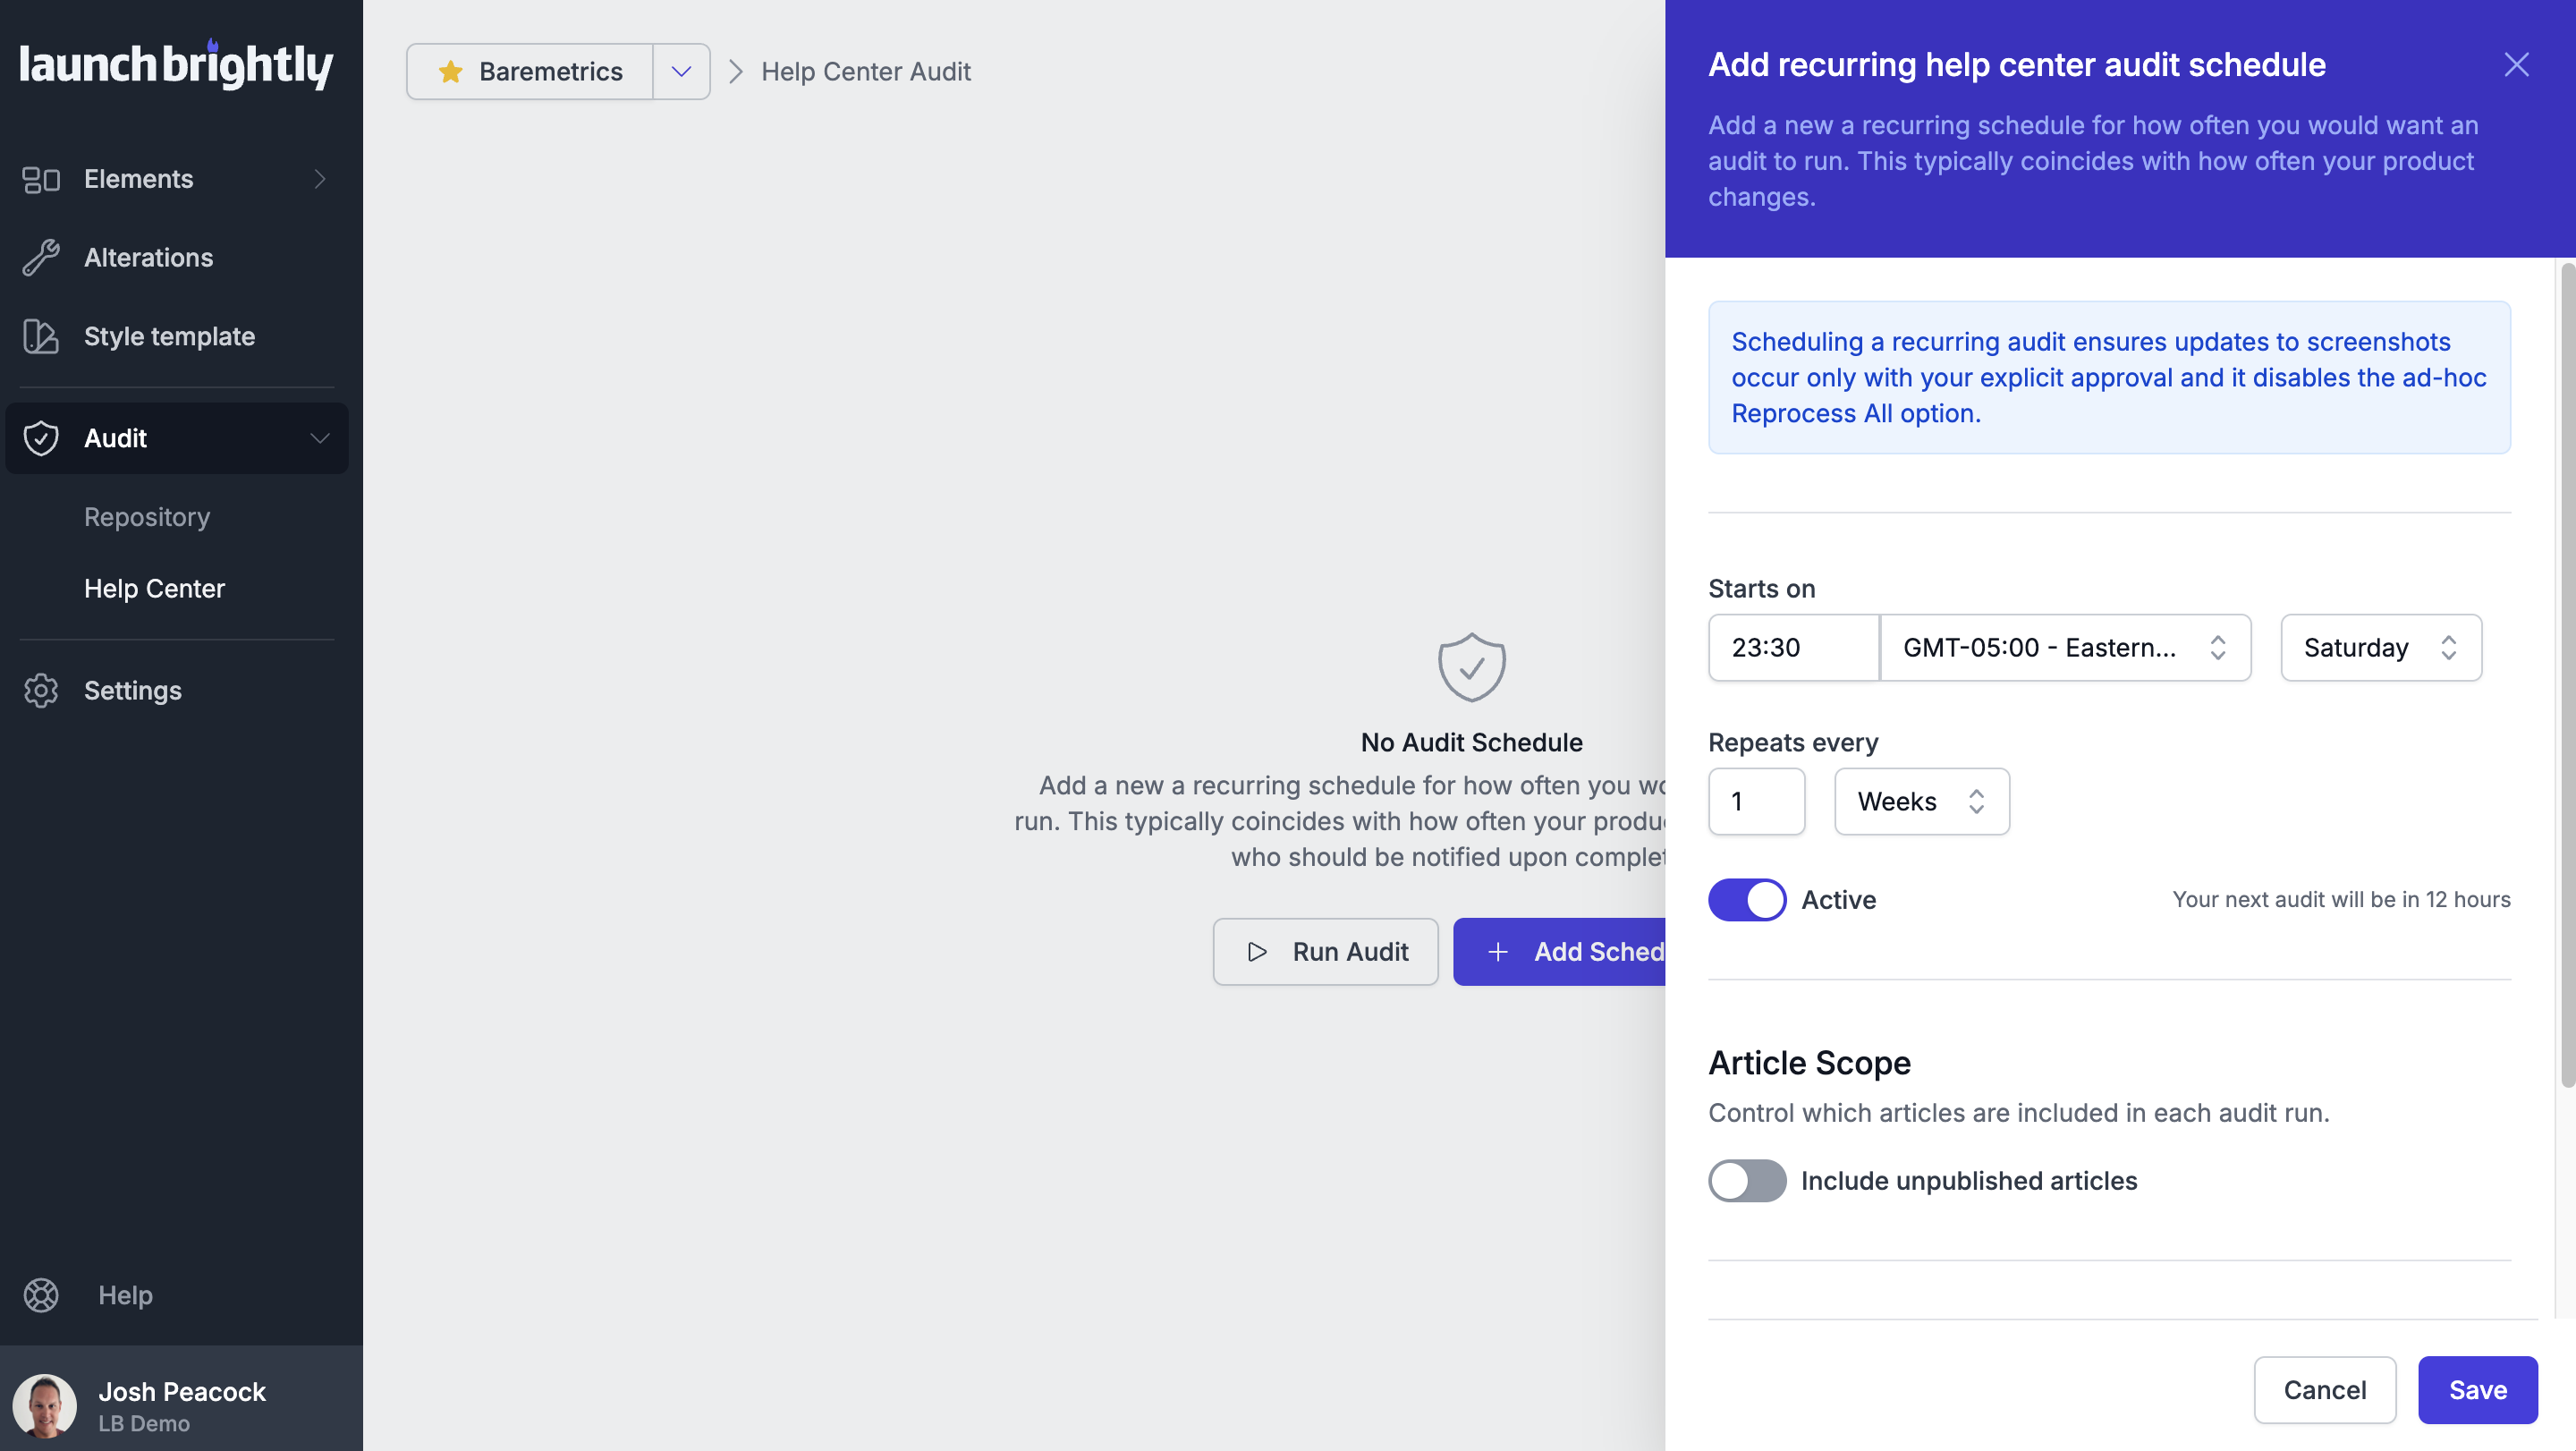
And this isn’t a one-off exercise for the POC. Once you’re fully up and running, the same audit process runs on a recurring schedule — biweekly, monthly, or whatever fits your release cycle. Each audit reprocesses your automation recipes to generate fresh screenshots of your product, compares them against what’s currently live in your help center, and automatically surfaces anything that’s changed for review.
Every detected change lands in a comparison view, with the old screenshot next to the new, so you can see exactly what’s different before deciding whether the fresh screenshot is ready to go live. Approve it, and the updated screenshot syncs back to the help article automatically — no downloading, no dragging and dropping, and no manually replacing images inside individual articles.
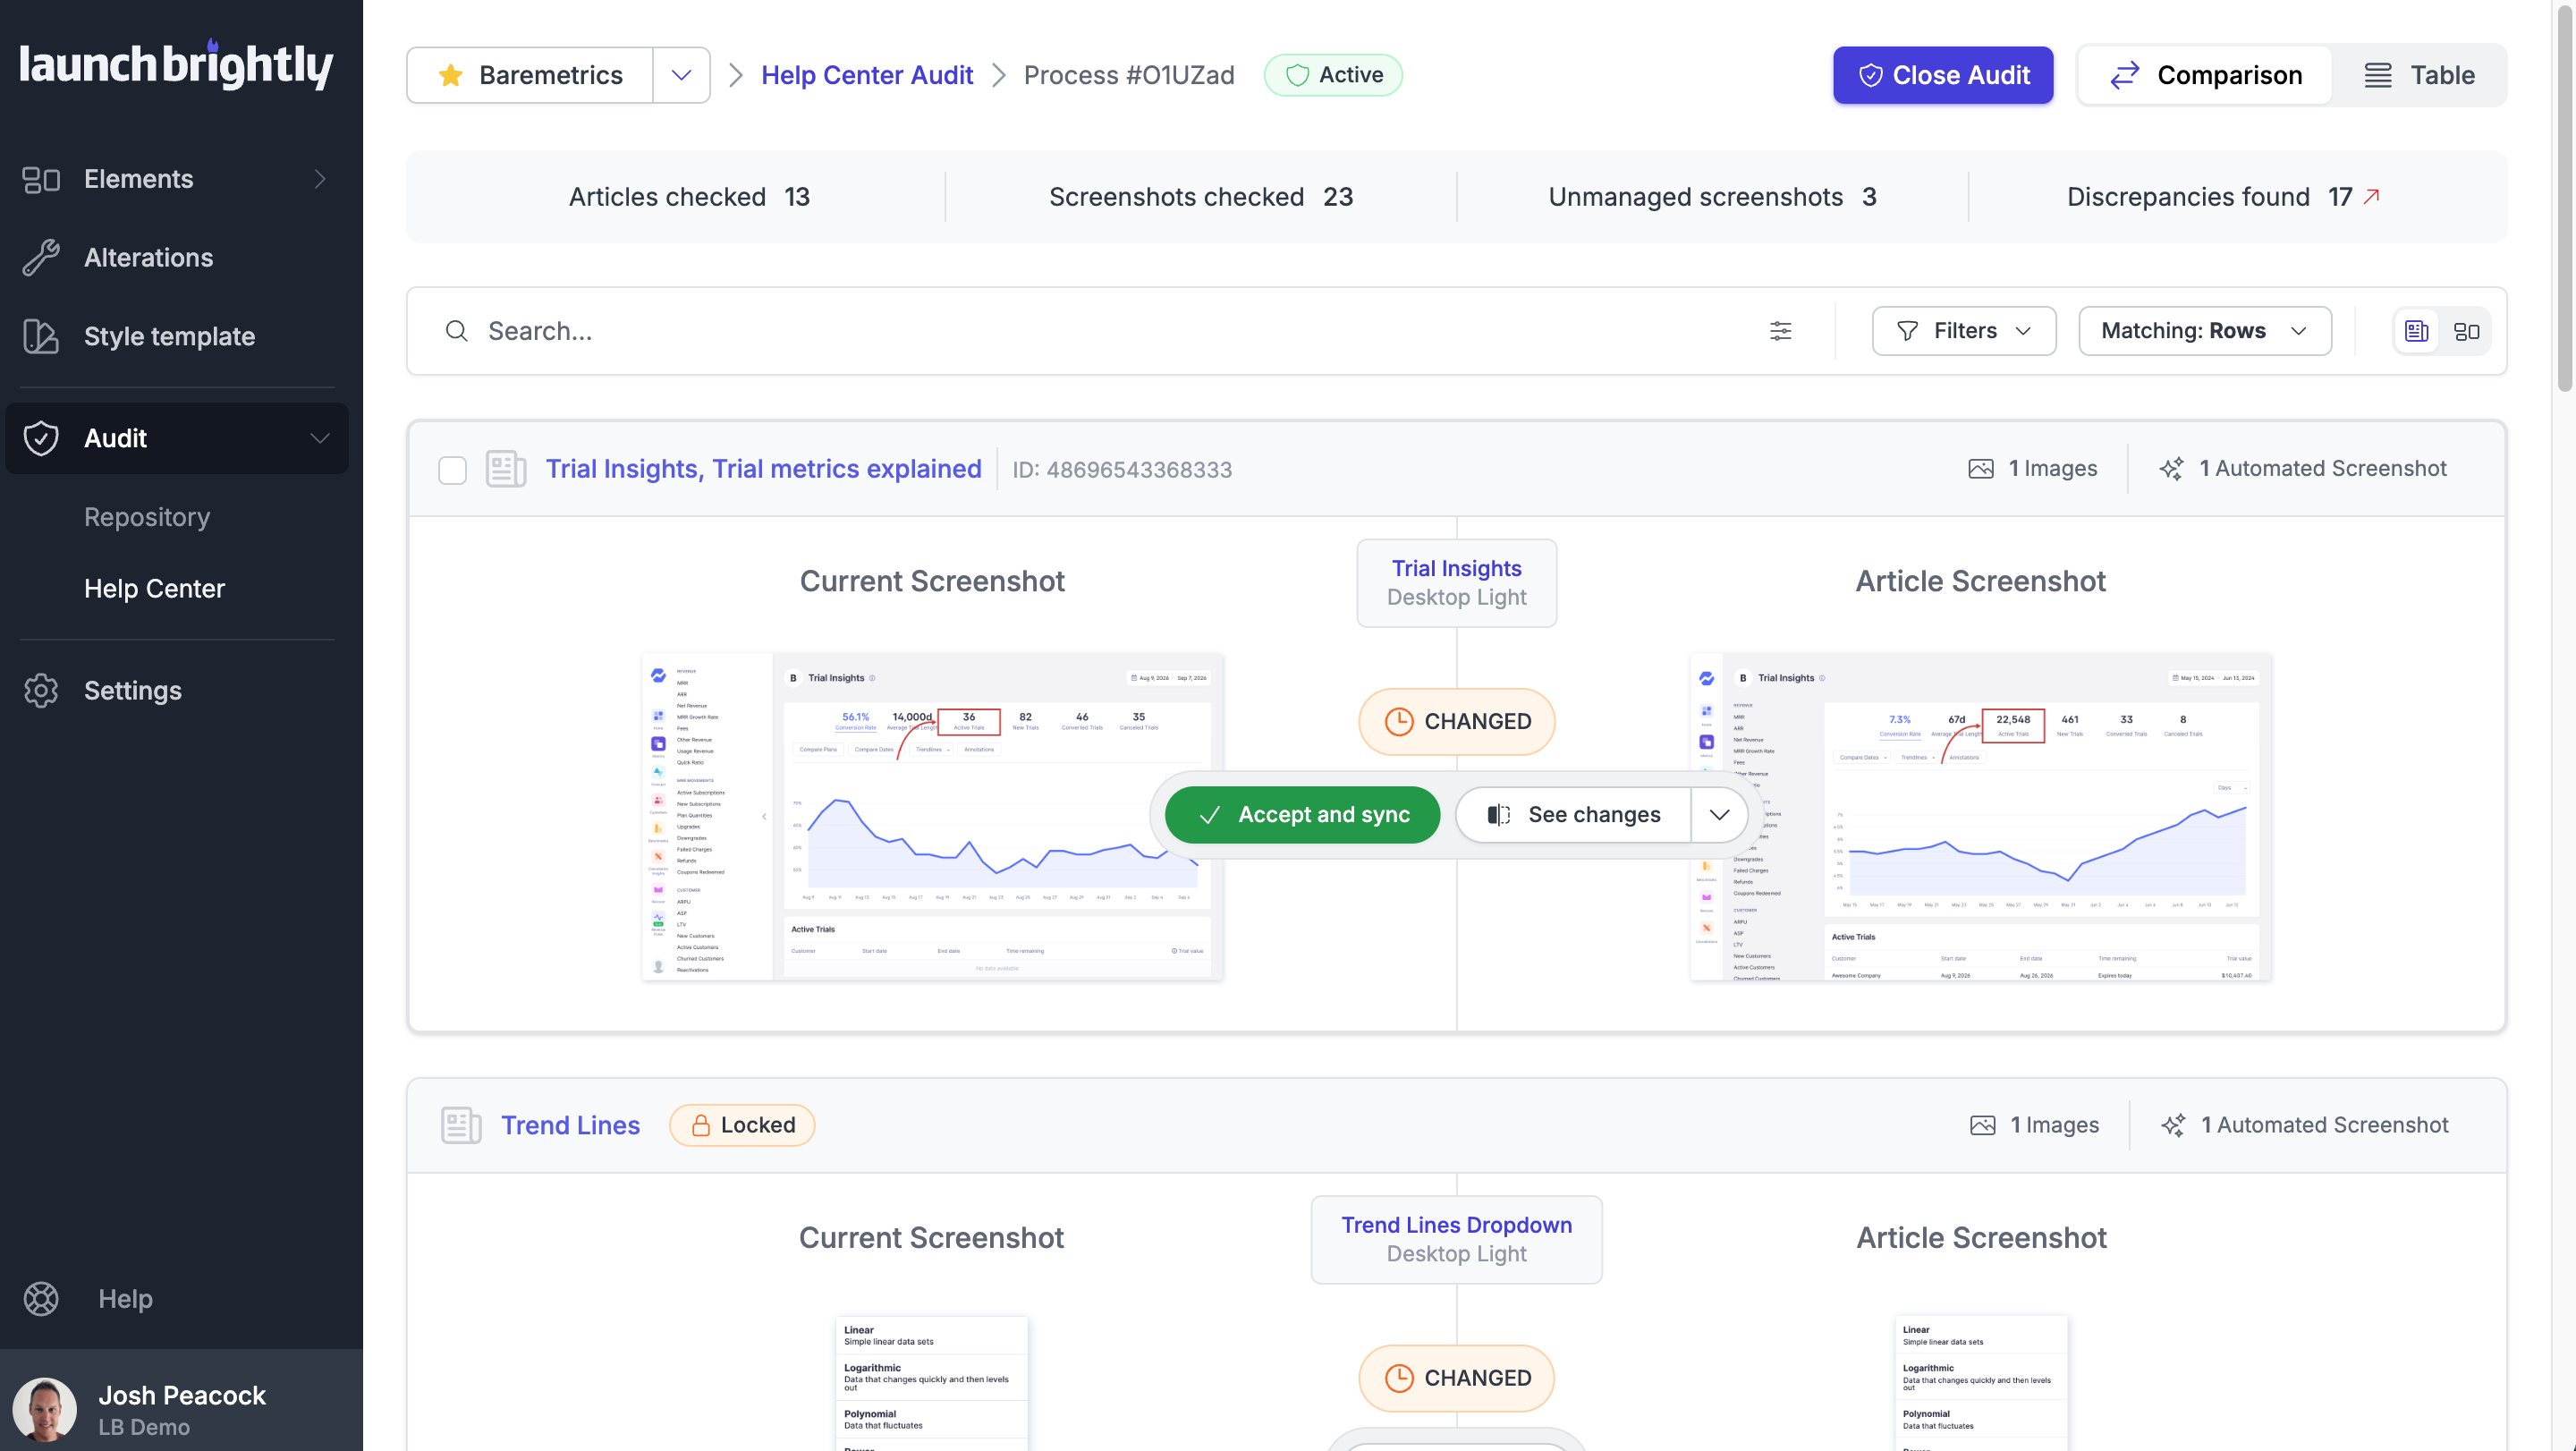
Not ready to update your help center yet? Mark it as reviewed, and the screenshot stays exactly as it is until you decide it’s ready to be updated. You still know what changed and where, while remaining in control of what actually goes live.
This is also where the relationships mapped during your initial import really start to pay off. The platform maintains a live map of where every screenshot appears across your help center.
When a screenshot appears in more than one article, approve a change once and it can update everywhere that screenshot is used, though you can just as easily scope the sync to specific articles instead.
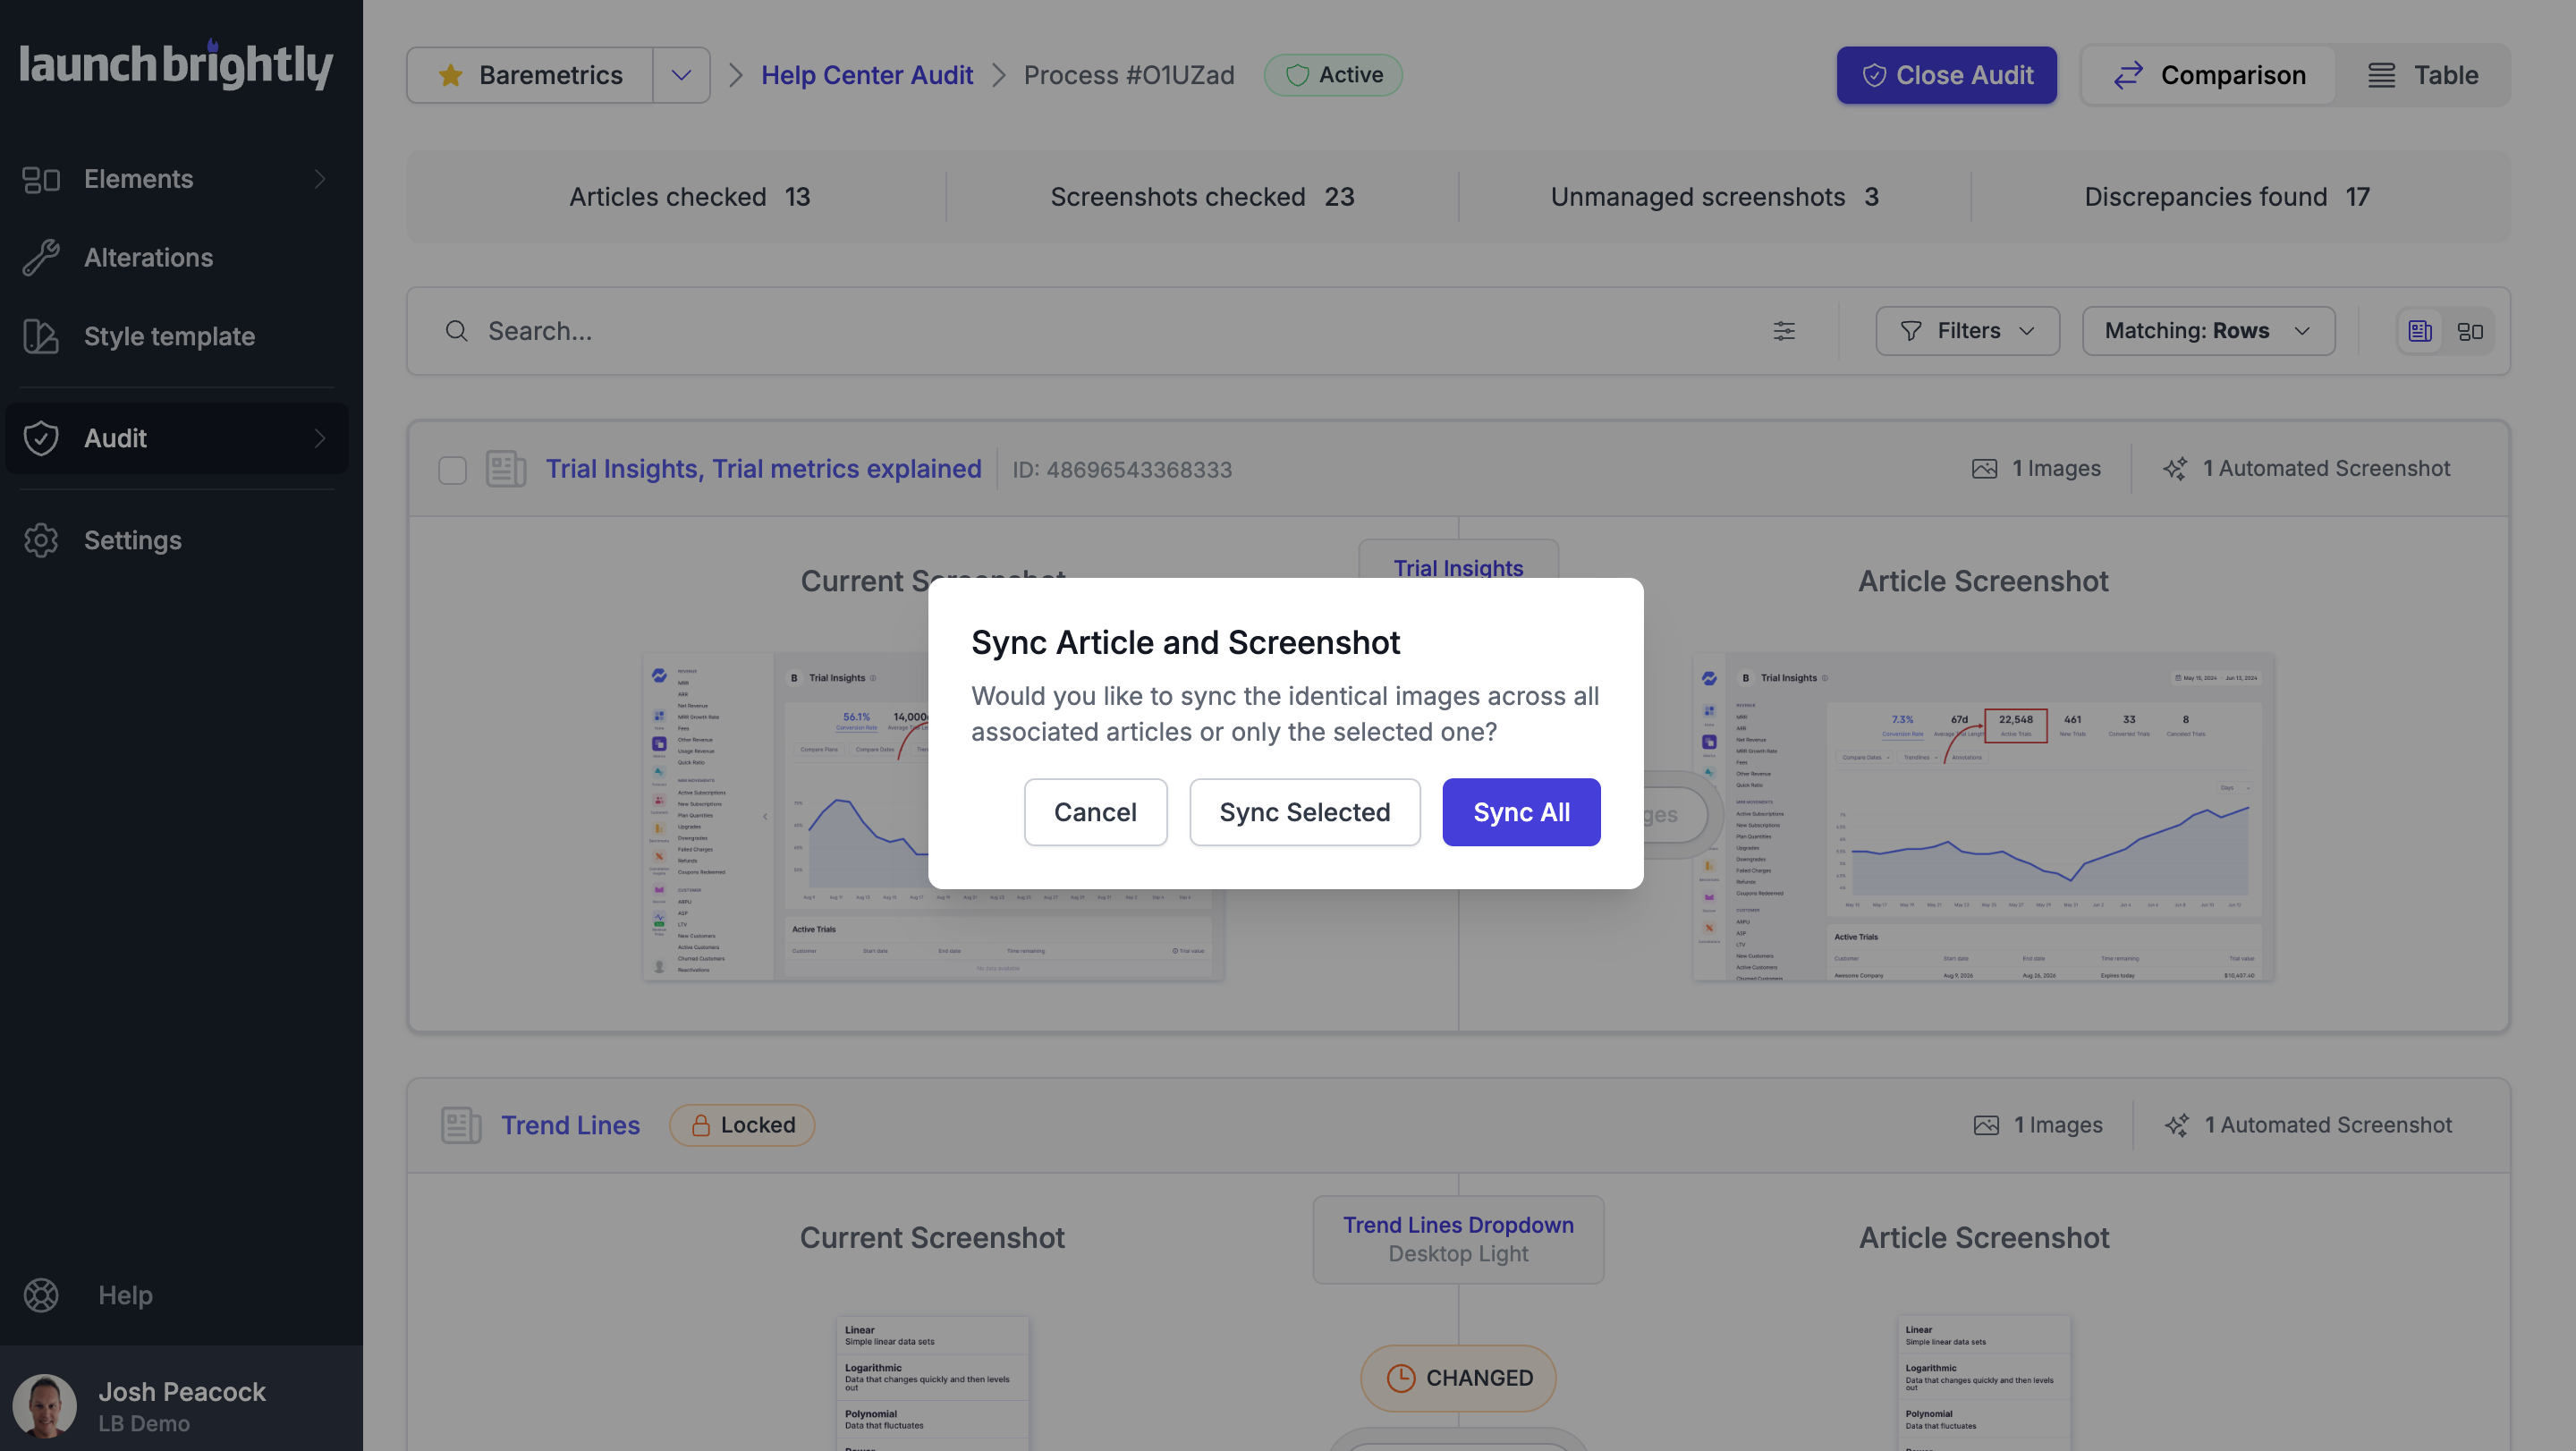
A navigation screenshot reused across six articles is no longer six separate updates to track down and make. It’s one visual asset, one change to review, and one approval that can flow through everywhere that screenshot belongs.
And throughout the process, nothing is pushed live simply because an automation ran successfully. Your team sees the fresh output alongside what’s currently published, reviews exactly what changed, and decides whether that new screenshot should become the version your customers see.
What a completed POC should prove
A useful POC shouldn’t leave you with a collection of nice-looking screenshots and a general feeling that the platform looks promising. It should leave you with evidence of the complete process working against your own product and documentation.
By the end of the POC, you should have seen the automation securely access your authenticated application using the same access path as a regular user, reliably reproduce representative product workflows, and generate screenshots that meet your visual and documentation standards.
You should also have seen how reusable automation recipes turn those workflows into something that can be regenerated rather than recaptured, and how styling, annotations, and alterations stay attached to the automation rather than becoming another layer of manual image editing.
Most importantly, you should have seen the full automation loop — not just generating fresh screenshots, but connecting them back to your help center, identifying where existing screenshots have drifted from your product, reviewing those differences, and syncing approved updates back into your live documentation.
That’s the real purpose of the POC. It isn’t to prove that a platform can take a screenshot; plenty of tools can do that.
It’s to prove that the repetitive work surrounding screenshots can become a repeatable, automated system: accessing your product, reproducing workflows, applying visual standards, identifying changes, understanding where screenshots are used, reviewing updates, and keeping your help center in sync.
And once that system works across a representative slice of your documentation, scaling it becomes a question of coverage rather than feasibility.
Your product will keep changing. New releases will ship, navigation will move, workflows will evolve, and the screenshots across your help center will change with them. The difference is that you’re no longer relying on someone to notice when your documentation falls behind. You now have a repeatable system that catches those changes, puts them in front of your team for review, and keeps your help center moving right alongside your product.
Want to see it working against your own product and documentation? We’ll run a no-cost Proof of Concept using your own product, screenshots, and help center so you can see the complete screenshot automation workflow working in your environment.
Ready to scale beyond the POC? Our Implementation Specialists create the automation recipes for your existing screenshots as part of the initial implementation.